


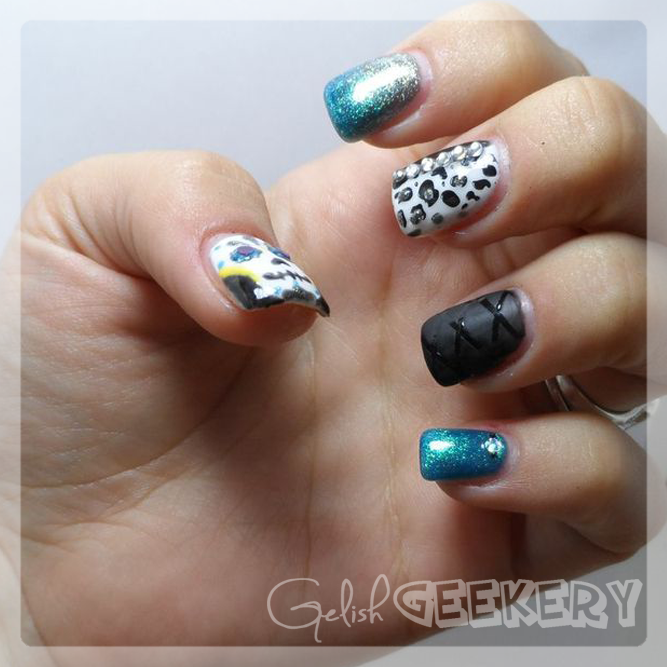
The matte TIO REALLY would've come in handy this past weekend, too. I did a Gelish manicure on my work colleague and I wanted to try a criss-cross matte/shiny look with the Orly Matte top coat I have, like this:

By neglelakkmani.com
I put on the regular Gelish TIO, laid down some striping tape, then put two coats of Orly Matte top coat on, letting each coat dry. What I found once I started pulling the tape off was that the matte top coat gunked up along the tape and left these thick, gunky lines all over the nail. The only way to get it to work right was to take the striping tape off BEFORE the top coat dries. The whole time I was thinking, "If this was 3 days later I'd have my Gelish matte top coat, grumble grumble".

For the above manicure I did the following:
Pinky Nail:
- 3 coats Oocha Coocha Bing Bang Bam Alakazy Alakazam, cured all coats
- Dabbed Foundation and pressed the studs in, cured
- 1 coat TIO, cure
- 2 coats of Black Shadow, cured all coats
- 1 coat TIO, cure
- Laid down striping tape
- 1 coat Orly Matte top coat, immediately remove striping tape BEFORE top coat dries
- 3 coats Sheek White, cured all coats
- Wiped tacky layer with Cleanser
- 2 coats of Black Shadow off-set along the side of the nail, cured all coats
- 1 coat TIO, cure
- Wiped tacky layer with Cleanser
- Using Konad Black stamping polish, stamp Konad cheetah print into nail
- Let dry, then dabbed Showstopping into the centers of the cheetah print, cure
- Dabbed Foundation and pressed the studs in, cured
- 1 coat TIO, cure
- 3 coats Showstopping, cured all coats
- Applied Oocha Coocha to the top half of the nail and, before curing, applied more Showstopping toward the bottom, brushing the wet colors together to make a gradient, cure
- Repeat step 2 as needed to achieve gradient
- 1 coat TIO, cure
- 3 coats Sheek White, cured all coats
- Wiped tacky layer with Cleanser
- Painting details using Ooocha Coocha, Black Shadow, Showstopping, and Gella by ENP in "Lily", curing as needed
- Dabbed Foundation and pressed the studs in, cured
- 1 coat TIO, cure


0 comments:
Post a Comment