Showing posts with label Gelish Polish: Make A Difference. Show all posts

Monday, February 10, 2014


I actually could care less about Valentine's Day itself, really. My fiancée and I go on dates and buy little treats and surprises for each other all year, so I don't buy into the manufactured hype. But for the sake of nail art? Yes, I will buy into that. ;)

I'm kicking off a week of Valentine's Day nails with some really simple heart-tipped nails. I'm actually doing these in order to test the fade levels of the pinks I used, so you'll probably see these nails pop up again in Fade Alert posts (or, if we're lucky, you won't!)
Gelish Valentine Heart Tipped Nails
The heart tips are super easy to make with the normal polish brush. I put on 2 coats of The Perfect Silhouette then wiped the tacky layer. This turned out to be a mistake, as wiping really thinned the color and made it sheer in some areas. You should be able to see that pretty clearly on the middle finger. I didn't realize how sheer it was until after the mani was said and done, so I just left it alone. On my other hand I didn't wipe the tacky layer before painting the hearts and everything was fine.

From thumb to pinky I used, respectively, You're So Sweet You're Giving Me A Toothache, Go Girl, Make A Difference, Gossip Girl, and Less Talk. I topped the whole nail off with Gelish Matte TIO and then added some regular TIO to the tips, to make the hearts shiny.

I also bought my very first bottle of Essie for this mani!! Srsly, if I collected RNP it'd be Essie. Their colors are like a siren song every time I enter a CVS. I picked up Forever Yummy and, before beginning my Gelish mani I painted the undersides of my nails. I've been dyyying to try Louboutin nails so I figured they're long enough… why not?

They're kinda cool. Maybe I'll do them again sometime, but they don't pop as much as I hoped they would. It might just be the color I picked, though.

Sunday, November 10, 2013

Gelish Adventure Time Nails I. Love. Adventure Time.

"But it's a kids show!/It doesn't make sense!/It's just weird!"

Au contraire.

This show is FULL of adult themes and humor and some really intense imagery that seems like nonsense at face-value but can be deconstructed for further meaning. The show is LITTERED with subtle geek culture references, from Sailor Moon, to Batman, and I think a recent ep was referencing Totoro. These 15 minute episodes are full of character development, recurring themes, and SO MUCH BACK STORY. When you watch the show, keep in the back of your head that the show is set in post-apocalyptic earth and suddenly background scenery and seemingly nonsense dialouge will seem much more significant.
Go watch the episode "What Was Missing". It's 13 minutes of your life you won't regret. Then start from season 1. It gets better every season.

So ANYWAY we went to the Comikaze con last weekend in Los Angeles and had a toooon of fun! I decided I HAD to do some nerdy nails for the con and I wanted to rock my Adventure Time pride!
Gelish Adventure Time Nails
Gelish Adventure Time Finn and Fionna Nails
These nails are soooo much fun and I got a ton of compliments! IN FACT, the gals at the Boom Studios booth loved them and took pics of them... AND tweeted them to the Boom Studios twitter account!! MATHEMATICAL!!!

I did Adventure Time with Finn & Jake on my right hand and Adventure Time with Fionna & Cake on my left hand. I'd love more Fionna and Cake episodes, but Adam Muto seemed pretty adamant that Ice King's foray into fanfic is done (but, hey if Xergiok can make another appearance pretty much anything is possible, right? Right!? *siiigh*)

I should also mention that I fixed 4 chipped corners on my right hand using the chipped nail tutorial I posted earlier this week! :D So far, no problems!

For the above manicure I did the following:

Thumb Nail:
  1. • 2 coats Up In The Blue, cure all coats
  2. • Wipe tacky layer. Using a nail art brush, applied Sheek White for the hat shape, cure
  3. • Mixed Skinny Vanilla Latte with a bit of Sheek White on a piece of foil
  4. • Wipe tacky layer. Using a nail art brush, applied Skinny Vanilla Latte/Sheek White in the desired shape for the face, cure
  5. • Applied 1 coat of TIO, cure
  6. • Wipe tacky layer. Using a nail art brush and FolkArt acrylic paints, added the face and hair details
  7. • Finished with 2 coats of TIO, cure

Index Nail - Jake:
  1. • Mixed Gella "Lily" with a bit of Orange Cream Dream on a piece of foil and applied 1 coat to whole nail, cure
  2. • Applied 1 coat of TIO, cure
  3. • Wipe tacky layer. Using a nail art brush and FolkArt acrylic paints, added the face details
  4. • Finished with 2 coats of TIO, cure

Index Nail - Cake:
  1. • 2 coats Sheek White, cure all coats
  2. • Wipe tacky layer. Using a nail art brush, painted yellow spots with Gella "Lily", cure
  3. • Using a nail art brush and FolkArt acrylic paints, added the face details
  4. • Finished with 2 coats of TIO, cure

Middle Nail:
  1. • 2 coats Up Take Action, cure all coats
  2. • Wipe tacky layer. Using a nail art brush, applied Make A Difference for hair, cure
  3. • Applied 1 coat of TIO, cure
  4. • Wipe tacky layer. Using a nail art brush and FolkArt acrylic paints, added the face and crown details
  5. • Added a tiny dot of Up In The Blue for the crown detail, cure
  6. • Finished with 2 coats of TIO, cure

Ring Nail:
  1. • 2 coats Cashmere Kind of Gal, cure all coats
  2. • Wipe tacky layer. Using a nail art brush, applied Cocktail Party Drama for hair, cure
  3. • Applied 1 coat of TIO, cure
  4. • Wipe tacky layer. Using a nail art brush and FolkArt acrylic paints, added the face and bite mark details
  5. • Finished with 2 coats of TIO, cure

Pinky Nail:
  1. • Mixed Gella "Lily" with a bit of Orange Cream Dream on a piece of foil and applied 2 coats to whole nail, cure all layers
  2. • Wipe tacky layer. Using a nail art brush, applied Orange Cream Dream for hair, cure
  3. • Applied 1 coat of TIO, cure
  4. • Wipe tacky layer. Using a nail art brush and FolkArt acrylic paints, added the face and red gem details
  5. • Finished with 2 coats of TIO, cure

Wednesday, September 25, 2013

Gelish Dreamcatcher Manicure Awesomesauce tutorial requests aside, I've gotten a few requests to do nails! The owner of the gym I go to is determined to come over and have me to her nails and one of my coworkers is coming over on Saturday to get her nails did. In addition, my BFF is in town! We've been spending the past couple of weekends going out, visiting, and having a good time. I offered to give her a Gelish manicure before she leaves, so we decided she'd come over and we'd have a little nail party. However there was one small problem... I don't really HAVE anywhere to DO nails. Honestly, I just sit cross-legged on the floor at my coffee table and do my nails while watching TV.
I decided to remedy this.

I repurposed an L-shaped desk we weren't using into a handy little nail station. It's PERFECT! Neither my BFF or my roomie had to sit on the floor! ;)

First up, my BFF's nails!
Gelish Japanese Manicure
So, I was really inspired by a set of japanese nails I saw on Pinterest:
Japanese Nail Art
Originally found on ameblo.jp

I loved the colors, the fade, the jewels, and decided to recreate it using My Favorite Accessory, Plum & Done, and Make A Difference. I like how it turned out! However, I really need to figure out the best way to do a fade with Gelish. It's kinda hard and time-consuming. I think I need to practice more on my swatch wheel and figure out the best method.
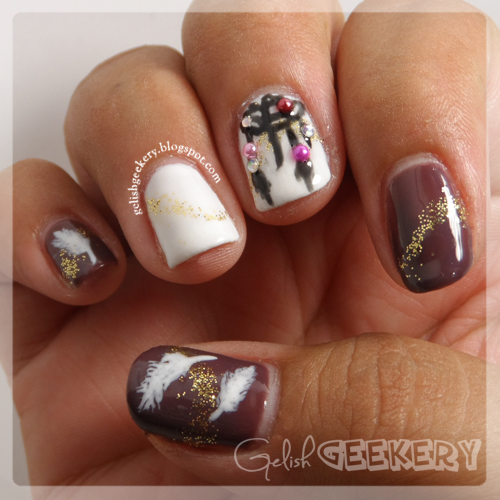
Gelish Dreamcatcher Manicure
For my roomie I tried dreamcatcher nails, using Sheek White, Lust At First Sight, and Black Shadow for the nail art. I love the way these nails look! Although it's apparent I need better nail art detail brushes - the more I look at the dreamcatcher the more critical I am of it. I actually JUST ordered what I hope are better nail art brushes, so I hope if I try something like this again I can get better detail with the Gelish polish. Also, I didn't flash cure the polish on a piece of foil before using it for nail art, so that could've resulted in some messy detail as well.