Showing posts with label Gelish Polish: Black Cherry Berry. Show all posts

Tuesday, November 26, 2013

If you've clicked through to my blog you might have noticed a few changes. :) I was over my last template and uploaded a free template I found on the interwebz (credits at the bottom of the page, however the banner is still my own ;). I really love the light colored blogs - they looks so clean and fresh and uncluttered. I also love that this template has a little featured post section at the top! How cute is that!?

I also fiiiiinally bit the bullet and set up a Facebook page. I really, really hate Facebook, but I figured it was a good tool to have. No joke, it took me like 2 hours to figure out what I needed to do. Two hours. I work in computer tech and do web adminy stuff for my job... and yet the labrynthine bowels of Facebook befuddle me every time.
But, well, now I have a Facebook page. I think I'm gonna use to to push blog posts and any news items or deals I come across that aren't worth a whole blog post. :) Now I'm trying to decide whether I should set up a Twitter for the same purpose... or if that's too redundant. We'll see.

In other news, this past weekend I got a repeat client! :D
Gelish Fall Tribal Manicure
She wanted fall colors and tribal, so that was what she got! I used Black Cherry Berry and Skinny Vanilla Latte, with a touch of All That Glitters Is Gold on the pinky. The black tribal design was drawn on with a Migi Nail Art Pen and the gold was painted on with a brush and gold Folk Art Acrylic paints. I don't think I was even breathing while drawing on the tribal designs! I kept repeating, "Straight lines, straight lines, straight lines...".

I also ran a bit of an experiment and I applied the studs OVER the TIO with a bit of Structure and didn't apply any more TIO over the studs - this is because I've noticed the gold colors tends to fade off the studs once the top coat is on. No buenos. I found out her studs already fell off, so I'm going to get some replacement studs over to her. I'm gonna try picking up some gold Pieadra studs. They tend to be more expensive, but it'd be worth it if they don't fade under the top coat.

Monday, November 25, 2013

With Thanksgiving around the corner I wanted one more shot at fall nails. I had purchased these gorgeous gold maple leaf studs from AthenaRose with the express intent of rocking some fall leaf nails. Typically I like to draw out what I want to do on my nails, just stupid little sketches that no one but me seems to understand, but for some reason I was having such. a. hard. time. coming up with a design. I wanted to cram WAY to many colors and arts and effects and it was overwhelming me. I finally said, alright, I want fall colors, glitter, and gold, and came up with something I liked.
Gelish Fall Leaf Nails
Yeah... they're still REALLY busy... but I really like them!! (also, please ignore the amateur hour air bubble on the pinky >.<) I finally tried doing the cut-out/negative space/peek-a-boo effect that's so popular with Japanese nail art ( The Nail Room blog actually JUST posted a how-to on it). It actually wasn't nearly as difficult as I thought it was going to be, although I think practice definitely makes perfect with those. ;)

And, even though I LOVE the way they look... I don't think I can continue to rock the square nails. The corners of my nails are so brittle and break easily, and I feel like I'm having a hell of a time filing them into consistent lengths. Does anyone else have this problem? My pinky and ring finger nails sit far back on my knuckle, whereas my middle and index sit pretty far forward. As a result my pinky & index nail always appear longer than my middle & index. It just drives me crazy. I think I'm gonna try an almond shape next...

For the above manicure I did the following:

Thumb Nail:
  1. • 1 coat Simple Sheer, cure
  2. • Wipe tacky layer. Using a nail art brush, create a moon shape along the bottom of the nail with Black Cherry Berry. Applied 2 coats of color, cure all coats
  3. • Using a nail art brush, create a leaf shape toward the tip of the nail with Double Shot Espresso. Applied 2 coats of color, cure all coats
  4. • Using a nail art brush, fill in the tip of the nail with Orange Cream Dream. Applied 2 coats of color, cure all coats
  5. • Scrubbed a tiny bit of craft store glitter into the tacky layer of the leaf
  6. • Using a nail art brush, dabded a small amount of TIO over the glitter, cure. This will keep the glitter from spreading across the nail
  7. • Dabbed Gelish Structure onto the polish and pressed the studs in, cure
  8. • Finished with 2 coats of TIO, cure all coats

Index Nail:
  1. • 3 coats Black Cherry Berry, cure all coats
  2. • Scrubbed craft store glitter into the tacky layer, creating a gradient effect
  3. • 1 coat All That Glitters Is Gold, cure
  4. • Finished with 1 coat of TIO, cure

Middle Nail:
  1. • 1 coat Simple Sheer, cure
  2. • Wipe tacky layer. Using a nail art brush, created an outline of color with Black Cherry Berry. Applied 2 coats of color, cure all coats
  3. • Dabbed Gelish Structure onto the polish and pressed the studs in, cure
  4. • Finished with 2 coats of TIO, cure all coats

Ring Nail:
  1. • 2 coats Orange Cream Dream, cure all coats
  2. • 2 coats Black Cherry Berry 2/3 down the nail, sponged the color to create a gradient, cure all coats
  3. • 2 coats Double Shot Espresso 1/3 down the nail, sponged the color to create a gradient, cure all coats
  4. • Scrubbed craft store glitter into the tacky layer, creating a gradient effect with 3 different glitter colors
  5. • Finished with 1 coat of TIO, cure

Pinky Nail:
  1. • 3 coats Black Cherry Berry, cure all coats
  2. • Dabbed Gelish Structure onto the polish and pressed the studs in, cure
  3. • Finished with 1 coat of TIO, cure

Friday, November 8, 2013

Gelish Foil Nail Art Kit Review So, I spent the better part of October relentlessly hounding every Sally's Beauty within a 15 mile radius of my home, calling and asking when they were going to get the new Gelish Nail Art Kits in. It wasn't until October 31st that I went into a Sally's, asked if they had any of the kits... AND THEY DID!!
I've been particularly interested in the Foil Nail Art Kit, as foil nail art was something I've never tried but had always been curious about. I bought the kit without knowing anything about it, other than that it existed, so I eagerly opened up the kit the second I got in the car to see what was inside.
Gelish Foil Nail Art Kit Review
This seems silly in retrospect, but I had no idea the kit would include polish! The kit comes with:
  • 1 Gelish Black Shadow mini polish
  • 1 Gelish Black Cherry Berry mini polish
  • 10 different foil sheets
  • 1 wooden cuticle pusher stick
  • A How-To booklet
I was excited about the Black Cherry Berry (yay! new colors!) but, being completely new to foil nail art, I looked at the foil sheets and thought, "Hmm, that doesn't seem like much..." We'll revisit that thought later. ;)
Gelish Foil Nail Art Kit Review
After ogling my new polish I wanted to look through the booklet and see how difficult the process would be. (If you're curious, the QR code leads here: thefoilnailartkit.gelishminis.com) The answer: not difficult at all! It's a 6-step process (well, 3, really) that I'll walk through with you. My fiancée volunteered to be the guinea pig on this little experiment. :)
Gelish Foil Nail Art Kit Review
2 coats of The Dark Side

First up, apply 2 coats of your base coat. The directions use the included Black Shadow, but we went with The Dark Side (which, by the way, is WAY more gorgeous than I've ever given it credit for! It's a lovely blue/green/purple/teal.) The instructions then say to let the polish sit on your nails for a full minute after curing the second coat to "let the tacky layer thicken". Truthfully, I had no idea the tacky layer thickened...
Gelish Foil Nail Art Kit Review
Foil scrubbed into the tacky layer with my nail

Next, apply the foil silver side down (colored side up) to the tacky polish layer and press into the polish. I did the initial press and lifted the foil to find only a couple teensy pieces of foil had transferred onto the nail. I pressed the foil back down and began to scrub across it with my thumb nail to REEEALLY transfer the foil into the nail and was happy with the result. I was also suprised by how little foil actually transfers off the foil sheets, so my previous concern about the size and quantity of the foil sheets is moot.
Gelish Foil Nail Art Kit Review
Only a tiny corner of the foil sheet transferred to the nail

Next up, their instructions say to apply a thin coat of Black Cherry Berry over the foil, but I went with another thin coat of The Dark Side. That extra coat of polish really gives the foil a nice, finished look. Before putting the extra coat of polish on it just kinda looked like I'd tried to peel a sticker of my nail and some of the glue and backing was left behind.
Gelish Foil Nail Art Kit Review
A thin coat of The Dark Side completely changes the look of the foil

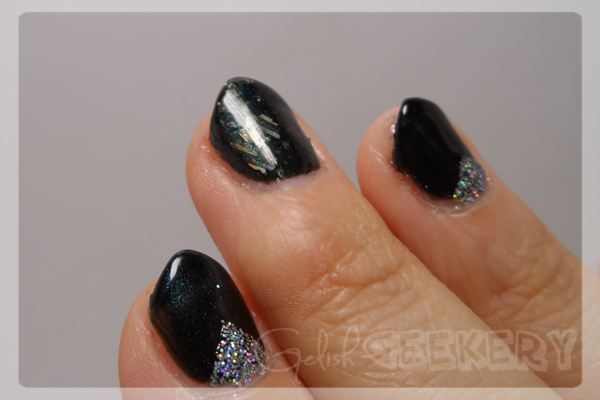
You finish off with TIO and Cleanse, as usual, and here is our final look:
Gelish Foil Nail Art Kit Review
All in all it was really fun, quick, and easy! It's definitely a simple way to add a little extra pizzaz to your nails. This seems like a really good kit for someone who is just starting their Gelish collection, something you could get in addition to the Basics kit and a couple of colors. I'll be curious to see what kinds of nail art I can do with the foil. :)

Feel free to ask me any questions in the comments (and, since this is my first review, let me know if I missed any important points/concerns!).