Showing posts with label Gelish Polish: Seafoam. Show all posts

Monday, April 21, 2014


It's spring! And I've been craving some gorgeous spring colors on my nails, but I haven't really been inspired to wear "spring" nails - like flowers and bunnies and all that jazz. I knew I wanted to use Seafoam and Sweet Morning Dew, then I decided I wanted to use my seashell studs, and from there mermaid nails were born.
Gelish Spring Mermaid Nails
I'm in love with these nails. IN LOVE. I don't even have them on anymore and I'm still in love with them. If my nails hadn't been freakishly long (for my tastes) I would've kept them on for a third week. I loved the colors and the studs (gurl, I went STUD CRAZY) and OMG THE FOIL NAIL. Right now I'm like:
No joke. I also used the Gelish VitaGel Nourishing as the base coat for this mani. I've been hesitant to pick up a VitaGel because I read horrible reviews when they first came out. But my nails are just... guys, they're tore up. Not even gonna lie. It's because I use too many coats of Top It Off combined with Structure and studs and... it makes removal really, really hard on my nails.

But I'm happy to report I'm writing this up a day after removal with the VitaGel basecoat and... removal was fantastic!! I thought it'd be a particularly hard removal sesh, as the studs + the Structure make it difficult for the acetone to break down the polish, but the Vitagel came off super smooth and in solid pieces. I used it exactly as I would've used regular Foundation, dry brush and all, and I had absolutely no problems with wear. No peeling or lifting, removal was great, and my nails looked substantially less tore up once I got the polish off. I think I might switch exclusively over to VitaGel for my manis here on out!

Oh, and I'm stoopid for not taking before/after pics for the VitaGel. Lots of fail right there.

For the above manicure I did the following:

Thumb Nail:
  1. • 2 coats Sweet Morning Dew, cure all coats
  2. • Dabbed Gelish Structure onto the polish and pressed the studs in, cure
  3. • Finished with 2 coats of TIO, cure all coats

Index Nail:
  1. • 3 coats Seafoam, cure all coats
  2. • 1 coat Candy Shop, cure
  3. • Dabbed Gelish Structure onto the polish and pressed the studs in, cure
  4. • Finished with 2 coats of TIO, cure all coats

Middle Nail:
  1. • 1 coat Oocha Coocha, cure
  2. • 1 coat Are You Feeling It?, cure
  3. • 1 coat Oocha Coocha, cure
  4. • 1 coat of TIO, cure
  5. • Wipe tacky layer. Stamp image using Konad White and MoYou Suki 01 plate. Let dry completely.
  6. • Finished with 1 coat of TIO, cure

Ring Nail:
  1. • 2 coats Sweet Morning Dew, cure all coats
  2. • Dabbed Gelish Structure onto the polish and pressed the studs in, cure
  3. • Finished with 2 coats of TIO, cure all coats

Pinky Nail:
  1. • 3 coats Seafoam, cure all coats
  2. • Press gold foil into the tacky layer until desired look is achieved
  3. • Finished with 1 coat of TIO, cure

Sunday, July 21, 2013

Gelish Watermarble and Watercolor This week I decided to try something I've been DYING to try: a watermarble with Gelish polish. Now, I've seen people extolling the joy of Gelish due to it's ability to easily dry marble, and while the dry gel marbles are really cute in their own right, they just aren't the same as a watermarbles. I just love those loops and swirls of color that swoop nonsensically across the nail.

MuckingFusser Watermarble
By MuckingFusser, the watermarble Queen

I'd seen a couple YouTube videos showing one could watermarble with Gelish and, this week, I wanted to give it a try myself. I decided to combine my love of watermarbles with my love of Japanese style nail art and I'm officially proclaiming it a success! I had at least 4 fails that I had to take off and redo, but after some trial and error I finally figured it out!

Gelish Watermarble and Watercolor

For the above manicure I did the following:

Ring & Middle Watermable Nails:
  1. • Started off with 2 coats of Sheek White and 1 coat of TIO
  2. • Poured bottled water into a shot glass and wrapped medical tape around my nails to help with the clean-up
  3. • Mixed up Coco Cabana Banana with a bit of Don't Be Such A Sourpuss to get a toned down, less neon yellow
  4. • Alternately dripped the yellow mix, My Favorite Accessory, A Petal For Your Thoughts, and Seafoam into the water. The mixed yellow didn't "spread" in the water as well as the other ones, so less yellow ended up being visible in the final marble. I pulled the polish across the water to get the design I wanted
  5. • I stuck my nail on the part of the design I wanted and kept my finger in the water
  6. • I picked up the UV light and held it over the water for 10-15 seconds, just enough to slightly cure the left over gelish that wasn't on my nail
  7. • I then took a toothpick and gathered up the remaining polish - just like they do in all the tutorial videos. I found this step was actually really, really important: if you just pull your finger back out of the water with the Gelish polish still floating on the surface, that polish will layer back over the nail as you pull your finger out. This'll essentially create two layers of polish on the nail and it'll bubble and wrinkle horribly once you cure it
  8. • I removed the tape from my finger and cleaned up around the nail with an art brush and non-acetone remover
  9. • Cure the nails, TIO, cure again, and you're done!
For the other three nails I was going for that gorgeous watercolor effect I see on so much Japanese nail art. While I like how the watermable and watercolor art turned out, I don't think I'll combine them again. The watercolor is so deleicte and the watermarble so bold that they don't mesh well enough for my tastes.

Hana4 Japanese Nail Art
By hana4, I love her nail art SOMUCH.

Thumb, Index, & Pinky Watercolor Effect Nails:
  1. • Started off with 1 coat of Simple Sheer, TIO
  2. • Then followed with 2 coats of Sheek White, allowed for the half moon peek-a-boo, and TIO
  3. • Dripped spots of my yellow mix, My Favorite Accessory, A Petal For Your Thoughts, and Seafoam onto the nail and, using a small nail art brush, swirled and blotted the colors around until they were blended and mottled-looking. Cured.
  4. • Used craft glitter and small nail art brush to create a glitter line along the peek-a-boo half moons
  5. Used the same small art bush to apply TIO JUST on the glitter. I found that applying TIO like you normally would across the whole nail when the glitter is still loose on the nail will spread some glitter across the nail, and I didn't want that
  6. • Cure, then apply TIO across the whole nail. Cure, apply studs, more TIO over the studs, and done!

Sunday, July 7, 2013

9/20/13 Update: Now that summer's over it seems like the demand for these seashell studs has died down, but that means they can actually be FOUND! Here's a small list of places I know currently have the shells in stock:
I've actually purchased from all three of these sellers and have had no problems. :)

8/22/13 Update: jewelrynailartsupply.com has started selling Pieadra seashell studs! She's got the 4mm and 5mm sizes, but is sold out of the gold 4mm as of this writing. Keep checking back at her site!

7/25/13 Update: shopthenailroom.com has gotten in contact with me and is offering a special discount to anyone visiting through my blog! Use discount code GELISHGEEKERY to get 15% off orders over $20 (expires September 14th)! I just ordered my shells and am planning on featuring them in my next manicure. So excited!

7/22/13 Update: shopthenailroom.com just opened and began selling their own gold seashell nail studs. On their instagram, @shopthenailroom, they're offering a 15% off discount code, GRANDOPENING, that expires July 26th. I'm definitely gonna grab some up!


About a month ago I was browsing nail art on Instagram when I suddenly came across a manicure and immediately said, "HOLY SHIT BALLS I NEED THAT."


From ThePolishedFox.com

I just fell crazy, crazy in love with it. Especially with the seashell. How classy! How beachy! I had to have it, I just needed to pick up some seashell studs and I'd be fine, right?

Little did I know that I was about to embark on an obsessive, epic search that would suck up days of my life. That classy little seashell was, literally, NO WHERE TO BE FOUND. I googled my face off and could not find it ANYWHERE. I Yahoo Answer'd it, Redditted it, got the GF on board, woke up in the middle of the night thinking, "oh, I didn't use this search term..." Nothing. I stared lurking through comments left on any nail art that featured that gorgeous golden shell - I saw a lot of other people asking, "where'd you get that!?" and no answers.

Finally, my GF discovered miniature scallop shells on eBay. The sizes checked out and I figured I could paint a couple of them with gold nail polish and apply them to my nails, so I grabbed up a bag of mini shells. Immediate problem solved, but epic Mystery of the Golden Seashell Nail Stud still ongoing.

Through my searches I noticed a trend - most of the nail art featuring these gold seashell nail studs were coming out of Japan. I pulled up google translate, popped in "gold seashell nail stud", translated it to Japanese, and googled it.

OH MY GOD.

There they were, hiding on the Japanese sites. The seashell nail studs are made (predominantly, it seems) by a Japanese brand, Pieadra. Unfortunately, it doesn't seem like these Japanese sites ship internationally. Poop. I emailed jewelrynailartsupply.com when I saw they sold th Pieadra brand, but she said as far as she could see the seashells were sold out.

I live near quite a few asian-oreinted beauty and nail supply places, checked those out, but no luck there.Then, about a week later, after I'd given up on my search and applied my copycat mani... I FOUND THEM! Now, I've never used this site and I can't vouch for it, but it seems as though, theoretically, possibly, they'll ship to the US. So, for anyone that was like me, looking for these damn seashell metal nail art studs... you're welcome. A good 25+ hours of my life to find this.

However IF you know of any place in southern California or any other shop online that sells them, PLEASE comment here!

And now, on to my version of the mani!
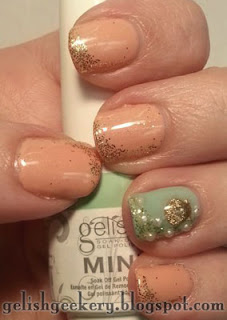
Gelish Seashell Nail Stud Art

For the manicure above I did the following:
  1. Mixed about 4-5 drops of Take Action with one drop of Orange Cream Dream and one drop of Sheek White in an attempt to get a nice coral color. I put three coats of "coral" on.
  2. 3 coats of Seafoam on the ring finger
  3. Dipped a nail art brush into gold glitter and "scrubbed" the glitter into the cured polish
  4. 1 coat TIO on all
  5. Ring finger details:
    • A couple days before I took the smallest of my mini seashells and painted them with 2 coats of Sally Hansen Hard as Nails Xtreme Wear in Golden. I put a drip of foundation in the underside of the shell and cured it
    • Dotted Foundation where I wanted the studs, set studs, and cured
    • Finished with 2 coats of TIO
I'd like to note that I'm writing this up about 5 days after I applied the manicure and I'm noticing some definite fading on the coral color I mixed. The pink pigment is all but gone and the nail color really just looks like a pale orange. It still looks nice, but it's ineresting to note that the Candyland and Breast Cancer Awareness lines might not mix too well.