Showing posts with label Gelish Polish: Skinny Vanilla Latte. Show all posts

Saturday, December 21, 2013


Today I was happy to have a new person over for a Gelish mani! The owner of the dance/fitness studio we go to has been bugging me for MONTHS to have me do her nails, and we were FINALLY able to make that happen! She showed me a few manis she had pinned and one thing was clear: she needed a cute Christmas-y animal.
Gelish Christmas Reindeer Snowflake Nails
It turned out so cute! I decided I wanted to do a reindeer, but I didn't want the googly-eyed reindeer I've been seeing all over Instagram. I wanted cute, chibi reindeer! I found an an image on google that I was easily able to translate into a nail design.

All of her nails (except her ring finger) are 2 coats of Red-y And Waiting with 2 coats of Life of the Party to make a nice sparkle gradient. The snowflake is hand-painted with white Folk Art acrylic paint. On her ring finger, I used 2 coats of Sheek White, 3 coats of Double Shot Espresso, and 2 coats of Skinny Vanilla Latte. I used Black Shadow and Sheek White for the eyes, You're So Sweet You're Giving Me A Toothache for the cheeks, a dot of Red-Y and Waiting for the nose and topped the nose off with a dab of glitter from Life of the Party. Whew!

Tuesday, November 26, 2013

If you've clicked through to my blog you might have noticed a few changes. :) I was over my last template and uploaded a free template I found on the interwebz (credits at the bottom of the page, however the banner is still my own ;). I really love the light colored blogs - they looks so clean and fresh and uncluttered. I also love that this template has a little featured post section at the top! How cute is that!?

I also fiiiiinally bit the bullet and set up a Facebook page. I really, really hate Facebook, but I figured it was a good tool to have. No joke, it took me like 2 hours to figure out what I needed to do. Two hours. I work in computer tech and do web adminy stuff for my job... and yet the labrynthine bowels of Facebook befuddle me every time.
But, well, now I have a Facebook page. I think I'm gonna use to to push blog posts and any news items or deals I come across that aren't worth a whole blog post. :) Now I'm trying to decide whether I should set up a Twitter for the same purpose... or if that's too redundant. We'll see.

In other news, this past weekend I got a repeat client! :D
Gelish Fall Tribal Manicure
She wanted fall colors and tribal, so that was what she got! I used Black Cherry Berry and Skinny Vanilla Latte, with a touch of All That Glitters Is Gold on the pinky. The black tribal design was drawn on with a Migi Nail Art Pen and the gold was painted on with a brush and gold Folk Art Acrylic paints. I don't think I was even breathing while drawing on the tribal designs! I kept repeating, "Straight lines, straight lines, straight lines...".

I also ran a bit of an experiment and I applied the studs OVER the TIO with a bit of Structure and didn't apply any more TIO over the studs - this is because I've noticed the gold colors tends to fade off the studs once the top coat is on. No buenos. I found out her studs already fell off, so I'm going to get some replacement studs over to her. I'm gonna try picking up some gold Pieadra studs. They tend to be more expensive, but it'd be worth it if they don't fade under the top coat.

Thursday, October 31, 2013

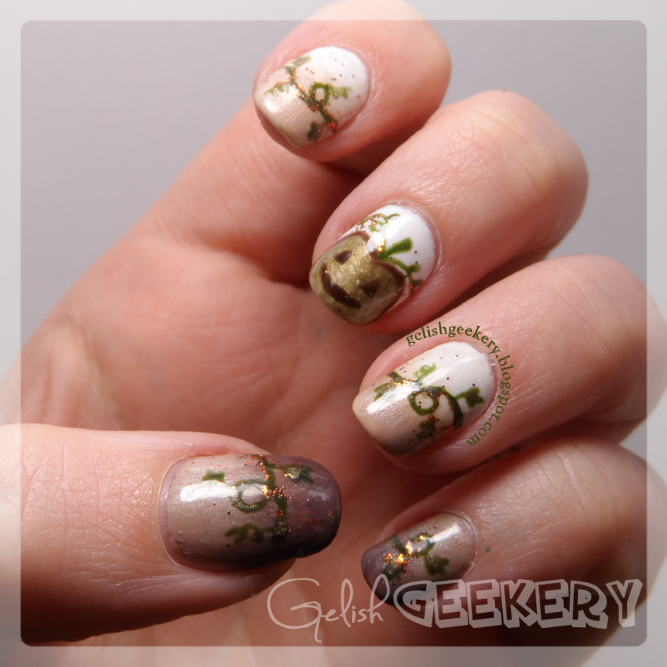
Gelish Halloween Jack-O-Lantern Pumpkin Manicure by Gelish Geekery I had a rather busy weekend last weekend! We went and checked out one of the venues we're seriously considering for our wedding: The Mission Inn.
We've decided on a theme for the wedding: Harry Potter. That's right, I said it, we're having a Harry Potter wedding... and it's gonna be AWESOME!! We (re: my fiancée) have been looking everywhere for a venue that has the right atmosphere. For Harry Potter, we didn't want something too contemporary. The Mission Inn has been caaaalllling to us and when we visited it this weekend, we just fell in love. We have another venue to look at, but we've asked the Mission Inn to hold the date for us. Unless this other venue can give us an insane deal, I think we're going with our first pick. D:

In other Harry Potter news, my fiancée FINALLY got her first tattoo, one she's been wanting for years:
Deathly Hallows Tattoo By GelishGeekery
Indeed, that would be a Deathly Hallows tattoo! I took a fountain pen, dipped it in ink, and kept drawing out the tattoo design until I got the right look. I thought it would be so cool if it looked like Dumbledore himself scribbled the symbol out with a feather quill... I love the way it turned out!! Am I feeling a little proud that, AFAIK, it's an original Deathly Hallows tattoo design? Why yes, yes I am.
Now on to the manicure! This'll be the LAST Halloween-inspired manicure, I promise!!

I actually did this manicure at the beginning of the month, but I got so excited about my most recent mani that I skipped over this one and decided to save it for last. I kinda wanted "classy Halloween" with fall colors, and I felt like this worked quite well for that.
Gelish Halloween Jack-O-Lantern Pumpkin Manicure by Gelish Geekery

For the above manicure I did the following:

Thumb and Pinky Nails:
  1. • 2 coats Skinny Vanilla Latte, cure all coats
  2. • Sponged on Lust At First Sight to create a gradient, cure
  3. • 1 coat TIO, cure
  4. • Wipe tacky layer. Using a nail art brush, painted vines with Polar Attraction, cure
  5. • Added a tiny bit of loose glitter
  6. • Finished with 1 coat of TIO, cure

Index and Ring Nails:
  1. • 2 coats Sheek White, cure all coats
  2. • Sponged on Skinny Vanilla Latte to create a gradient, cure
  3. • 1 coat TIO, cure
  4. • Wipe tacky layer. Using a nail art brush, painted vines with Polar Attraction, cure
  5. • Added a tiny bit of loose glitter
  6. • Finished with 1 coat of TIO, cure

Middle Nail:
  1. • 2 coats Sheek White, cure all coats
  2. • 1 coat TIO, cureure
  3. • Wipe tacky layer. Using a nail art brush, painted pumpkin with Don't Be So Particular and vines with Polar Attraction, cure
  4. • Painted pumpkin outline with Lust At First Sigh, cure
  5. • Added a tiny bit of loose glitter
  6. • Finished with 1 coat of TIO, cure

Tuesday, October 29, 2013

Gelish Black Matte Top It Off Nails With French Tip and Stripes I have just a quick post today to show off the two manicures I did this past weekend. :)

First, I did a Gelish manicure for my coworker's friend. She knew she wanted black matte but she didn't want to go all crazy with her nails, so I decided on a simple black matte with shiny french tip and, since she loves Nightmare Before Christmas, I added a black and white striped accent nail. I only used Black Shadow, Sheek White, Matte Top IT Off, and regular Top It Off.
Gelish Illusion Claw and Fang Nails
My fiancée found a picture of nails that gave the illusion that they were claw nails and she absolutely fell in love.

By HoneyMunchkin

I recreated the look using Skinny Vanilla Latte and Matte Top It Off under Inner Vixen with regular Top It Off. She also really wanted a nail with fangs or monster teeth, so I applied Inner Vixen to her whole thumb and used Sheek White to draw out some monster fangs.
Gelish Black Matte Top It Off Nails With French Tip and Stripes

Sunday, August 11, 2013

It's official: I FINALLY GOT MY SEASHELL STUDS!!!
Metal Seashell Nail Studs
Aren't they purdy!? A couple weeks ago I was poking around Instagram, looking for nail art, when I saw an announcement by a new account called shopthenailroom that they would be opening their Japanese nail stud store within the week and that it would contain seashell nail studs.
Some of you may be familiar with my epic search of doom for seashell nail studs. I was so, so stoked to find a seller on this side of the pacific that would be selling these studs. I immediately came to my blog and updated my previous post with the info cuz, let's face it - the vast majority of hits I get on this thing are from people looking for those shells!

By some strange circumstance, the store owner, oshimanails found my blog and hit me up, offering me a 15% blogger discount that I'm happy to pass on to you! I'm not getting any kind of commission, this is just a "help the nailists of the world" kind of thing ;)

shopthenailroom.com - Get 15% off order over $20 with code GELISHGEEKERY.

Right now she has gold and silver 5mm and 3.5mm seashell studs :D I'm just so glad my quest is finally done.
And now: on to the manicure!
I'm kinda sorta in LOVE with this Gelish mani. It's my favorite one since the nude & gold pearl mani. So, initially I was like, "OMG I WANT BEACHY NAILS BUT I CAN'T DECIDE WHAT I LIKE BEST SO HOW ABOUT ALL OF THEM!!" Like srsly I was going to do one of each of these on my nails:


By daily_charme

By MyMakeupMania

By CaptivatingClaws
PLUS the gold glitter nail that I ended up keeping. The night before I did my manicure I decided to do my first Gelish pedicure (linked to pedi pic because sometimes feet are weird to look at) and I ended up loving the Japanese nail art-inspired style so much I decided to recreate it on my nails. Thankfully, I decided to simplify things - but I still had to keep that cute beachy gradient by daily_charme. I used my new Gelish Garden Teal Party and lemme tell you - that formula is THICK! I tend to put my Gelish on thicker than I should (but somehow not thick enough to cause wrinkling) but this one gave me a run for my money. If the whole Love In Bloom collection is like this I bet it'd make great Gelish nail art polish. I also got to use my new 5mm seashell stud from shopthenailroom. Yup, it's just as awesome as I thought it'd be.

For the above manicure I did the following:

Index, Middle, and Pink Nails:
  1. 3 coats of Garden Teal Party, cured all coats
  2. Dabbed Foundation onto the polish and pressed the studs in, cured
  3. Finished with 2 coats of TIO, cured all coats
Thumb Nail:
  1. 2 coats of Up In The Blue, cured all coats
  2. 2 coats of Garden Teal Party, sponging off the first gradient fade, cured all coats
  3. 2 coats of Seafoam, sponging off the second gradient fade, cured all coats
  4. 2 coats of Skinny Vanilla Latte at the tip, sponging off the third gradient fade, cured all coats
  5. Scrubbed mix of gold and brown glitter into the tip of the nail
  6. 1 coat TIO, cure
  7. Dabbed Foundation onto the TIO and pressed the stud in, cured
  8. Finished with 2 coats of TIO, cured all coats
Ring Nail:
  1. 3 coats of Skinny Vanilla Latte, cured all coats
  2. Scrubbed mix of gold and brown glitter into the whole nail
  3. 1 coat TIO, cure
  4. Dabbed Foundation onto the TIO and pressed the studs in, cured
  5. Finished with 2 coats of TIO, cured all coats

Monday, June 24, 2013

Gelish Polish ORLY Matte Topcoat Last weekend the GF and I decided we absolutely HAD to have a nude-colored Gelish polish for the manicures we were planning on doing, so we hustled our butts over to Sally's to check out their Gelish Mini offerings (normally I prefer buying the full-sized bottles off Amazon for the same price as Sallys sells the minis, but instant gratification won over). My GF had fallen in love with a simple manicure she'd seen on Pinterest:


From mademoiselle-emma.blogspot.be

We decided on Skinny Vanilla Latte and noticed a sign saying if you bought a polish at full price you could get a red tagged polish for 50% off. I bee-lined it over to the red tagged polishes and was thrilled to see they had ONE color from the Love In Bloom collection, A Petal For Your Thoughts. I've been salivating over that whole collection, so I was excited to pick it up for $5!! We then noticed that the ORLY Matte Topcoat was also on sale. I love the matte look and, while I know manicurists have been creating a matte finish on Gelish by buffing the Top It Off shine, I'm lazy and inexpirenced and thought a matte topcoat would be waaaaay easier.

I haven't seen anyone definitively say whether any of the matte topcoats work over Gelish, and I'm here to give a definitive answer: YES, matte topcoats (at least the ORLY one) defintely work over Gelish Top It Off:

Gelish Polish ORLY Matte Topcoat

(Please forgive the meh-ness of this manicure -- it was the one we tested out our new LED lamp with. Oy.) Being a bit androgynous, my GF enjoys a slightly more masculine look on her nails - nude colors, sharp lines, stripes... I think the matte topcoat does a nice job of de-girlifying her look. You can se some shiny spots where I missed with the matte topcoat, but overall it dulled the nails quite nicely. I'm excited to mix the matte topcoat with shiny Top It Off accents in future manicures (especially with a lamp that works >.<). For the manicure above I did the following:
  1. One coat Sheek White
  2. 2 coats Skinny Vanilla Latte
  3. 1 coat Top It Off
  4. Added striping tape, then 2 coats of Black Shadow
  5. 1 coat Top It Off
  6. Wipe off TIO and applied the ORLY Matte Topcoat

Sunday, June 23, 2013

Last week I ordered some nail art pearls off Amazon. When I first saw people use them I poo-poo'd them as just being TOO much, but DAMN some of those manicures look so ELEGANT! I used the new nude Gelish color we just got and went to town!

Gelish Skinny Vanilla Latte
Gelish Skinny Vanilla Latte Gelish Simple Sheer
For this Gelish mani I used:
  • A base coat of Sheek White on all but the pinky nails
  • 3 coats of Skinny Vanilla Latte on all but the pinky nails
  • 2 coats of Simple Sheer on the pinky + Skinny Vanilla Latte and Sheek White for the little flowers
  • Nail pearls
  • Gold striping tape
  • Gold square nail stud
  • Some gold craft glitter I found on sale at Michaels
This manicure marked a couple of firsts for me:
  1. First time scrubbing in glitter
  2. First time using the pearls
  3. First time using Gelish polish to create nail art (more than polka dots or stripes, anyway)

1. Scrubbing Glitter In

So this was way easier than I had made it out to be. I took one of my nail art brushes, stuck it in the bag full of glitter, and brushed it right on to the nail. It was crazy simple and fast. I actually had way too much glitter on the brush than I needed - a little really does go a long way.

2. Using Nail Pearls

I'd recently read an awesome guest post on Chickette's blog that suggested using the foundation to apply nail studs and 3D art. I tried it out by putting a small dab of foundation on the cured/top-coated nail then placing the pearl on top. The pearl slid around a bit, but once I popped it under the UV light for 2 minutes it stayed put. I'm anxious to see how long it lasts!

3. Gelish Nail Art

Now, my previous attempts at using Gelish polish to actually paint designs on the nail have failed. Horribly. But from what I saw on the internet it was totally do-able. I decided to give it another go today and try painting some really small flowers on the sheer pinky nail. I'd put down my 2 coats of Simple Sheek then began trying to shape the flowers with the Sheek White. The color just bled into an amorphous shape, as I'd previously experienced. I decided to cure a Top-It-Off coat on top of the nail, wiped it clean, then tried applying the Sheek White flowers.

Omg, you guys.


THAT'S WHAT WAS MISSING THIS WHOLE. FRIGGIN. TIME. The polish didn't bleed any more! With Gelish I'm learning a very important rule: When in doubt, Top-It-Off.

One Small Catch

Literally. On my last coat of Top-It-Off on my pinky nail I went too thick and didn't clean it up well. Ever wanted to see what NOT to do with Gelish? Here you go:

Gelish Skinny Vanilla Latte

This is Gelish's Bane (Isildur ain't got nothin' on this). It's lifted where it cured against the skin, creating a delightfull little rivet in which water will travel into and, eventually, cause the whole thing to lift.

I'm giving that pinky nail until Friday, tops.

Other than that, I'm kinda in love with this manicure.