Showing posts with label Gelish Trends Collection. Show all posts

Monday, February 24, 2014


My roommate's mom and and dad just celebrated their wedding anniversary, and as part of that celebration the whole family went to Las Vegas for the weekend. But before going, her mom and sister stopped by our place and let me spruce up their nails ;)
Gelish Chevron Nails
First up, her sister wanted pink and chevrons. I'd actually bought some chevron nail vinyls, but they didn't get here in time so I ended up hand-panting the chevrons! I used Folk Art black Acrylic paint to create the chevrons, then once I had the design I went over then with a thin layer of Black Shadow to try to smooth and seal. I used A Petal For Your Thoughts (one of my FAVE colors) then asked her if I could improvise a little, and I added a Pinch of Pepper accent nail and a couple of stud that I felt pulled the mani together nicely. I really love this one! (even though it's on the simple side for me ;)
Gelish Zebra Nails
Next up was her mom. When they told me she needed sassy Vegas nails I immediately thought purple and zebra stripes. I used You Glare, I Glow across her nails and used Black Shadow to hand-paint the Zebra stripes. I then used a mixture of craft store glitter and Am I Making You Geish? on her middle finger. I mean, it's Vegas, full of drunk assholes... better make that middle finger sparkle. ;)

Friday, January 31, 2014

Gelish Chinese New Year Nails
The first month of this year has started off a bit rough. I have friends and family facing health and financial problems, so I felt like I was in need of some good luck to kick off the year. I decided to go with some reds and golds and stamping for Chinese New Year (is that PC? Is Lunar New Year better?).
Gelish Chinese New Year Nails
I gave the gold Konad stamping polish another shot, and I was again disappointed. It's just not very visible, which is a shame because the images from MoYou Suki 01 and 07 plates are gooorgeous. The middle finger stamp is a Japanese fan and on the thumb is the face of a Chinese dragon. I should also mention I had a HELL of a time getting the fan image to transfer with the Konad gold polish. I got my left hand stamped in a couple of tries, but even after 20 minutes I could NOT get the fan image to transfer onto my Konad stamper again so I could stamp the right hand. I even tried using a different polish to see if it was the stamper or the plate... the other polish was fine, it was just that Konad gold that wouldn't transfer. I ended up stamping a bamboo image on my right hand just to be done with it.

On the ring finger I used Kim from Ten Little Canvasses' tutorial on making gems with Gelish structure. I put a little gold glitter in the circle frame, but I wish I had used gold polish instead. I think it would've had a nicer effect. The index finger is a layer of Allure, All That Glitters Is Gold, some loose gold glitter, then another layer of All That Glitters.

I used 2 coats of Hot Rod Red for the red nails - really feels like the PEFECT red for Chinese New Year. I know Gelish came out with a Year of the Snake set last year and a Year of the Horse set this year, and while I still really want Meet The King, I think I'll skip on the other colors (at least until the collector's bug bites me). ;)

On the pinky and ring finger I used 2 coats of Allure over one coat of Arctic Freeze. I had thought that, since Allure was a bit sheer, I should lay down a layer of white. I did this on my left hand but on my right hand I did 3 coats of Allure with no white base coat. I really feel like the 3 coats of Allure looks much better than 2 coats over white. I also used Hot Rod Red to paint (what the internet tells me is) the year of the horse symbol.

Thursday, January 9, 2014


I have FINALLY returned from St. Louis.
We were supposed to have left on the 4th, but due to the Snowpocalypse Polar Vortex we didn't get out until Tuesday night! I should also apologize for all the snow spam on my Instagram over the past couple of weeks. Being from Southern California, snow is an exciting wonder, and even though we spent 3 hours in sub zero temperatures shoveling snow... it was still fun and exciting. ;)

I made out quite well for Christmas where polish is concerned. Tons of new Gelish polishes AND some MoYou plates! I also think I now have almost ALL the Trends polishes! I swatched a few more in case you're curious. Just click on the pics below to get the deets and more swatches on Candy Shop, Am I Making You Gelish?, Let Me Top You Off, and Too Tough To Be Sweet (I'm trying to keep the rest of my Trends swatches in one post, hence the linkage!)
Gelish Trends Swatch Candy Shop Gelish Trends Swatch Am I Making You Gelish?
Gelish Trends Swatch Let Me Top You Off Gelish Trends Swatch Too Tough To Be Sweet
I'm also trying something new with my swatch pictures. I decided there was way too much dead space in the pictures I had been taking, so I'm EVENTUALLY going to retake all my swatch pictures. My Color List right now is SUCH a mess. I've got some of my own pictures, a few Chickettes pictures, and some colors without any pictures at all! My goal is to get all that fixed and updated by the end of the month.

Thursday, December 26, 2013

Gelish Christmas Nails
Merry Christmas!
I had planned on getting this up on Christmas Eve, but I was SO INSANELY BUSY I had no time. I'm currently writing this up 2,000 miles away from home, visiting the soon-to-be in-laws (Steak N Shake and Cracker Barrel, here I come!!). I've received so many incredible Gelish and nail art gifts this Christmas (MoYou, omg MOYOU) - I can't WAIT to get home and start swatching and reviewing! As it is this will probably be my last post until the first or second week of January. :( But don't worry, I've got tons of stuff to write about in January!
Gelish Christmas Nails
While I've absolutely LOVED all the faire isle nail art I've been seeing, I knew I didn't have the time (or talent, omg) to create something so intricate. I decided on a simple, fun mani for Christmas that'd give me the opportunity for just a tiny bit of nail art. ;)

I also changed the shape of my nails (AGAIN) to a blunt almond/squaletto. I've seen that shape pop up a couple of times on Instagram and I loved how classy it looks. The corners of my nails are just TOO brittle to maintain a square shape (the corners chip even with gel polish on), but I thought this might be a nice way to have a square-ish shape while eliminating those pesky corners. The shape actually looked really severe and weird without polish, but once I got polish on and started capping the free edges it really softened up all the angles. I'm hoping with more practice I can make this shape work.

For the above manicure I did the following:

Thumb Nail:
  1. • 1 coat Just What I Wanted, cure
  2. • Scrub loose green craft store glitter into the tacky layer
  3. • 1 coat Just What I Wanted, cure
  4. • Wipe tacky layer. Paint on Sheek White until snowman shape is achieved, cure
  5. • Add one more layer of Sheek White to achieve opacity, cure
  6. • Add eyes and mouth with Black Shadow and buttons with silver Folk Art acrylic paint, cure
  7. • Finished with 1 coat of TIO, cure

Index Nail:
  1. • 3 coats Sheek White, cure all coats
  2. • Wipe tacky layer. Lay down two parallel pieces of striping tape, paint 2 coats of Red-Y And Waiting in a round shape, cure all coats
  3. • 1 coat Life of the Party over the red polish, cure
  4. • Using tweezers, slowy and carefully pull the striping tape off. Add dots and zig-zag pattern with Sheek White. Add ornament hook with silver Folk Art acrylic paint, cure
  5. • Finished with 1 coat of TIO, cure

Middle Nail:
  1. • 3 coats Sheek White, cure all coats
  2. • Paint design with 2 coats of Red-Y And Waiting and 2 coats of Just What I Wanted, cure all coats
  3. • 1 coat Life of the Party over the red polish, cure
  4. • Finished with 1 coat of TIO, cure

Ring Nail:
  1. • 3 coats Sheek White, cure all coats
  2. • Wipe tacky layer. Lay down 3 pieces of striping tape in a zig-zag pattern
  3. • 1 coat Just What I Wanted in triangle shape, cure
  4. • Scrub loose green craft store glitter into the tacky layer of the green polish
  5. • 1 coat Just What I Wanted, cure
  6. • Using tweezers, slowy and carefully pull the striping tape off. Add dot of Structure to top of tree and place stud, cure
  7. • Finished with 1 coat of TIO, cure

Pinky Nail:
  1. • 2 coats Red-Y And Waiting, cure all coats
  2. • 2 coats Life of the Party, cure all coats
  3. • Finished with 1 coat of TIO, cure

Monday, December 23, 2013


I spent this weekend trying to get everyone's holiday nails done in time for Christmas (and yet I STILL haven't done my own! Those go on tonight!). We're leaving to go out of state and visit the in-laws in a few days, and my fiancée has decided to let her nails grow out a bit for our upcoming trip. Then, the day before I was set to do her nails... one of her nails ripped off straight down to the quick.
She was understandably upset and while she did NOT want to file all her nails down, she also didn't want one gross nubby nail and asked me if there was anything I could do. It got me thinking. Kim at Ten Little Canvasses just let me know about an "AcryGel" method on YouTube. I thought maybe I could combine that with a plastic tip. I picked up acrylic powder and plastic tips from Sallys. I cut the tip down and glued the tip on to her nail stump with nail glue (after filing down the well to help it blend into her nail bed), then did the Foundation/Acrylic powder application (shown in the previous link) twice over the top of the whole nail and tip. I then did one more coat of Foundation, cured, and applied 2 coats of Structure to make sure that baby had a ton of support. I applied TIO, cured, and then worked on filing the nail down into the proper shape. One I felt I had a good shape, I applied my color gel polish as normal. So far it seems really strong. If it works out well I'll do a more thorough, visual tutorial.
Gelish White Icicle Ice Nails
Can you guess which one is the AcrylGel false tip? The middle one. :) I went with full glitter on that nail to mask my unprofessional blend line. ;) She told me she wanted white nails with an "ice" theme, so she basically got a lot of silver glitter ;) The manicure uses 3 coats of Sheek White, loose craft store silver holo glitter, and Am I Making You Gelish?. The Middle and Thumb nails have alternating layers of loose craft store silver holo glitter and Am I Making You Gelish? to get a really dense glitter look. For the Pinky nail, I literally picked out large glitter pieces from Am I Making You Gelish? and placed them on the nail. The Ring finger is using foil from the Gelish Foil Nail Art Kit (you can check out my tutorial on that over here).

And here's a bonus Christmas/Gryffindor nail set I did for my roommate this weekend:
Gelish Christmas Gryffindor Red and Gold Nails
I used 3 coats of Red-Y And Waiting and scrubbed a gradient with loose craft store glitter across all nails except the Ring finger. I also topped those nails with a coat of All That Glitters Is Gold. In the Ring finger I scrubbed loose craft store glitter into the Foundation layer, added a layer of All That Glitters Is Gold, then scrubbed loose craft store glitter into the polish layer, and added another layer of All That Glitters Is Gold. All the holo glitter in the All That Glitters Is Gold polish made it difficult for the camera to focus, but man her nails are mega-glitzy when they catch the light!

Saturday, December 21, 2013


Today I was happy to have a new person over for a Gelish mani! The owner of the dance/fitness studio we go to has been bugging me for MONTHS to have me do her nails, and we were FINALLY able to make that happen! She showed me a few manis she had pinned and one thing was clear: she needed a cute Christmas-y animal.
Gelish Christmas Reindeer Snowflake Nails
It turned out so cute! I decided I wanted to do a reindeer, but I didn't want the googly-eyed reindeer I've been seeing all over Instagram. I wanted cute, chibi reindeer! I found an an image on google that I was easily able to translate into a nail design.

All of her nails (except her ring finger) are 2 coats of Red-y And Waiting with 2 coats of Life of the Party to make a nice sparkle gradient. The snowflake is hand-painted with white Folk Art acrylic paint. On her ring finger, I used 2 coats of Sheek White, 3 coats of Double Shot Espresso, and 2 coats of Skinny Vanilla Latte. I used Black Shadow and Sheek White for the eyes, You're So Sweet You're Giving Me A Toothache for the cheeks, a dot of Red-Y and Waiting for the nose and topped the nose off with a dab of glitter from Life of the Party. Whew!

Friday, December 20, 2013


Here we go with yet another set of holiday nails! (didn't I say this would be Christmas Nail Week? ;) My coworker agreed with me that white nails are incredible and Need To Happen. I think I was scraping the bottom of my bottle of Sheek White for this one, but I got it done!
Gelish Christmas Holiday Nails White Snowflake
Did I buy teardrop studs for the express purpose of making Christmas light nails? Yes. Yes I did. But, when combined with a small round stud, they also made the CUTEST little bow on her ring finger! I used 3 coats of Sheek White on all her nails. On her pinky I scrubbed in some loose silver holo glitter from Michael's and created a fade from the tip of the nail. I then added a thin coat of Am I Making You Gelish over the top (sorry it's out of focus in this pic!).

On her index I used silver Folk Art acrylic paint to paint a snowflake (and used it for the Xmas light "wire" on her thumb). Now, her ring finger is where we're running an experiment. I really wanted to use silver striping tape, but we ALL KNOW that even under 2 coats of Top It Off that shiz will lift up. I was lamenting over this with my coworker when she said, "Why don't you just put Structure over the tape?"
If this works... nail art will never be the same. I'll keep ya'll posted.

Monday, December 16, 2013


Woah, it feels like forever since I posted (ok, only a week, but still!). I've been super busy with holiday-type stuff. Is anyone else counting the days until Xmas? Just this past Saturday I spent, literally, 12 hours straight baking cookies. It's worth it, and I love handing out plates of Xmas cookies, but MAN that's a long time to bake!
This week begins the Week of the Christmas Manicures. My coworker is coming over tomorrow, my roommate wants some simple red and gold nails, and then my fiancée and I will get our holiday nails on this weekend. I better just keep the red and green polishes out. ;)

In the meantime here's a NON-Christmas mani for your enjoyment :)
Gelish Pink Punk Stars and Glitter Nails
This mani is using Black Shadow with some Concrete Couture glitter accents and Brights Have More Fun with some Sweet 16 glitter accents. I used silver Folk Art acrylic paint to paint the silver accents.

I should also note that I'm late on posting this mani - I actually did it on my fiancée 3 weeks ago and am just now blogging it (my Instagram is always my most current place for manis). But Kim over at Ten Little Canvasses just posted a gorgeous shooting star mani a couple days ago. It's a weird coincidence, but I thought it was worth noting :)

Monday, December 9, 2013


It's December! And even down here in Southern California it's quite chilly. This month is absolutely packed for me, between office holiday parties, birthdays, THE HOBBIT, shopping, card-writing, THE HOBBIT, and the EPIC cookie-making weekend I have planed for next weekend, I'm pretty much BOOKED. Not to mention we're leaving on Christmas day to travel out to the midwest and visit the in-laws... and eat at Cracker Barrel and Steak N Shake. I'm simultaneously sad and glad we don't have either of those in California.
In really exciting me-news... I WON SOMETHING!!! Gelish Mini on Facebook was running a fall nail art competition. I submitted my fall nails for consideration... and I ended up winning!! The award was Trends polishes and a Mini kit (perfect timing - I'm almost out of Foundation and Nourish). If I end up getting Trends colors I already have I'm seeeeeriously considering running a giveaway! :)

And now on to this week's mani: snowflakes!
Gelish Snowflake Winter Nails
I've been so excited about getting into holiday and winter themed nails! I knew a few weeks ago I wanted snow flakes and I decided to go heavy on the white. Omg. I love these white nails. I'm going to have to force myself to use other colors besides white for the rest of my holiday nails this month. There actually is a coat of Rough Around The Edges on the gradient nails, but it's SO hard to see in the pic. Here's a close up:
Gelish Snowflake Winter Nails Rough Around The Edges
You can kinda see some flecks on the right side of the nail. I'm actually less and less impressed with that particular polish. If you just brush it on like you normally would, most of the little mylar flakes brush right off, so you kind of have to goup it on the nail to get a noticeable effect. In the end the effect is very, very minimal - but if minimal is what you want, Rough Around the Edges might be the polish for you.

For the above manicure I did the following:

Thumb Nail:
  1. • 2 coats Sheek White, cure all coats
  2. • 2 coats Up In The Blue, use a small piece of sponge on the uncured polish to create a gradient effect, cure all coats
  3. • 2 coats Caution, use a small piece of sponge on the uncured polish to create a gradient effect, cure all coats
  4. • 2 coats Rough Around The Edges on whole nail, cure all coats
  5. • Dabbed Gelish Structure onto the polish and pressed the studs in, cure
  6. • Finished with 2 coats of TIO, cure all coats

Index Nail:
  1. • 2 coats Sheek White, cure all coats
  2. • 2 coats Up In The Blue, use a small piece of sponge on the uncured polish to create a gradient effect, cure all coats
  3. • 2 coats Caution, use a small piece of sponge on the uncured polish to create a gradient effect, cure all coats
  4. • 2 coats Rough Around The Edges on whole nail, cure all coats
  5. • Wipe tacky layer. Using a nail art brush, paint snowflakes using white Folk Art acrylic paint. Let dry completely.
  6. • Dabbed Gelish Structure onto the polish and pressed the stud in, cure
  7. • Finished with 2 coats of TIO, cure all coats

Middle Nail:
  1. • 2 coats Sheek White, cure all coats
  2. • 1 coat TIO, cure
  3. • Wipe tacky layer. Lay down striping tape in criss-cross pattern
  4. • 1 coat Sheek White, cure
  5. • 1 coat Matte TIO, cure. DO NOT WIPE TACKY LAYER.
  6. • Using tweezers, slowy and carefully pull the striping tape off. It helps to keep the tweezers close to the nail as you pull, grabbing both the tape AND the polish that's covering the tape as you pull the tape off.
  7. • Once all tape is off, wipe tacky layer

Ring Nail:
  1. • 2 coats Sheek White, cure all coats
  2. • Wipe tacky layer. Using a nail art brush, paint snowflake using silver Folk Art acrylic paint. Let dry completely.
  3. • Dabbed Gelish Structure onto the polish and pressed the studs in, cure
  4. • Finished with 2 coats of TIO, cure all coats

Pinky Nail:
  1. • 2 coats Sheek White, cure all coats
  2. • 2 coats Up In The Blue, use a small piece of sponge on the uncured polish to create a gradient effect, cure all coats
  3. • 2 coats Caution, use a small piece of sponge on the uncured polish to create a gradient effect, cure all coats
  4. • 2 coats Rough Around The Edges on whole nail, cure all coats
  5. • Finished with 1 coat of TIO, cure

Monday, November 18, 2013

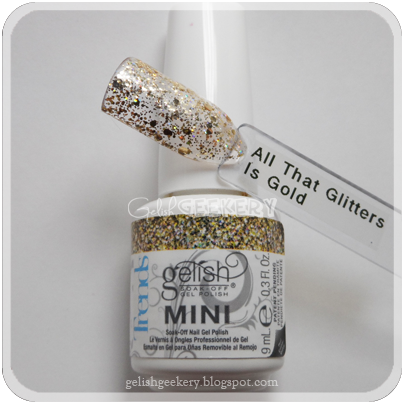
Gelish Trends Swatch: All That Glitters Is Gold
Does anyone follow the Sallys Beauty twitter account? If not, you really should be. I recently started following it because I realized they promote their 50% off clearance sales. Instead of hoping you'll wander into a Sallys and find their red tag items at 50% off, just follow their Twitter or Facebook and you'll know. I've purchased the vast majority of my Gelish polish via Sallys 50% off clearance sales. I got the entire Magneto collection for $2 a bottle, my Love In Bloom collection was $5 a bottle. Here's a couple of tips for snagging awesome deals on Gelish at Sallys:
  • • Spend $5 on the Beauty Club card. You get the discount member price and when you spend $25 in a single month you'll get a 15% off coupon in the mail.
  • • Sign-up for their club online and give them your birthday. They have these magical, magical birthday coupons: $10 off $20 during the entire month of your birthday. I combined that with a 50% off clearance sale and snagged a ton of polish for a super low price.
  • • Follow their Twitter or Facebook account. They may post random, 24-48 hour coupons only on their Twitter or Facebook that'll allow you to score major deals on Gelish polish. Just be patient and keep your eye out. Make sure you print out the coupon and the code is visible - the employees at Sallys may not know about these pop-up deals from Sallys, so be prepared for them to be a little skeptical and confused.
  • • 50% off Red tag sales tend to happen the first weekend in the month. Follow the Sallys Twitter or Facebook and they'll announce their red tag sales, but they typically happen at the beginning of the month.
  • • They typically red-tag last season's Gelish collection at the beginning of the month. For instance, I know the Snow Escape collection is coming out soon, probably in December, so there's a GOOD chance they'll red tag the Under Her Spell collection at the end of November/beginning of December. There's also a good chance they'll run 50% off clearance the first or second weekend of December. So my hopes are that November 29th-December 1st (or Dec 6th-8th) the Under Her Spell Collection will be newly red tagged AND 50% off. Is this a sure-thing? Nope. But it has worked for me in the past.
  • • Visit as many Sallys as you can during their 50% off clearance sales. I'm lucky to live in Southern California and there are at least 5 Sallys in a 15 mile radius from my house. When they had their red tag sale in May, I hit up a bunch a Sallys and got 4 out of 6 of the Love In Bloom polishes for $5. And with those colors I pretty much found one color per Sallys. Luck, determination, and too much time to spare really help ;)
With these tips I pretty much NEVER spend retail on my Gelish polish.

So, just last week I saw a deal pop up on the Sally's twitter: a 24 hour Buy-1-Get-1-Free sale on their polishes. Including Gelish.
Did I go to 2 different Sallys to capitalize on the deal? Yes. Yes I did. And of COURSE I got Trends polishes, since they're more expensive. Also, check this: at the first store I went to I got 4 Trends polishes - a $60 transaction. With the BOGO offer it came down to $30, and THEN I had a 15% off coupon (for spending $25+ the month before), bringing the total down to $25. If it had been my birthday month I probably could've slapped a birthday coupon on there and got the whole shebang for $15.

THIS is how I feed my addiction, ladies.

But that means I have more Trends swatches to show you!! I recently purchased big girl swatch sticks and, eventually, my Color List will be all my own swatches. :) MAD PROPS to the ladies who swatch gel polish on their nails. I dunno how you guys have the patience to cure and soak-off all. that. polish. I can't. Just thinking about it exhausts me. You guys are awesome.

On to the swatches! All swatch sticks have 3 coats of polish and the polish generally applies really, really well. I haven't experienced any wrinkling despite putting them on rather thick.
Gelish Trends Swatch: All That Glitters Is Gold
First up, All That Glitters Is Gold. Gooorgeous fully-loaded gold glitter with some holo accent glitters that really make this polish pop. Here's 1 coat of All That Glitters Is Gold paired with Black Shadow, Sheek White, and Backstage Beauty:
Gelish Trends Swatch: All That Glitters Is Gold


Gelish Trends Swatch: Lots Of Dots
Much like A Pinch of Pepper, I would call Lots of Dots a confetti polish more than a glitter polish. There's no shine or sparkle, but it really creates a cute, random polka-dot effect. Here's 1 coat of Lots of Dots paired with Black Shadow, Sheek White, and Caution:
Gelish Trends Swatch: Lots Of Dots


Gelish Trends Swatch: Are You Feeling It?
Are You Feeling It? is a gooorgeous loaded teal glitter (I LOVE teal!) - tons of sparkle and I'd love to use it with a mermaid mani. Here's 1 coat of Are You Feeling It? paired with Black Shadow, Sheek White, and Garden Teal Party:
Gelish Trends Swatch: Are You Feeling It?


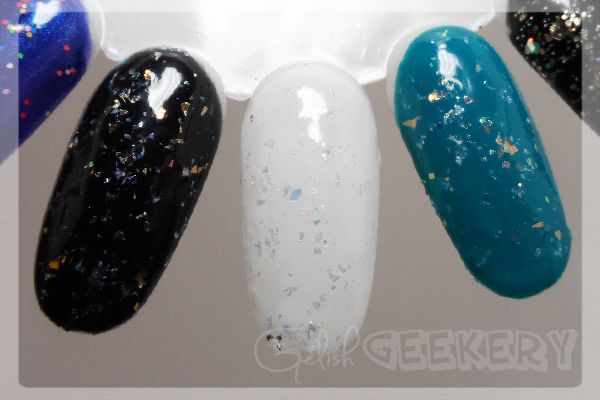
Gelish Trends Swatch: Rough Around The Edges
Now this one I picked up out of pure curiosity. Rough Around The Edges has these little mylar flakes, I guess you'd call it. The flakes make it kind of goupy and the swatch stick doesn't do it justice - you really have to see it over color. Here's 1 coat of Rough Around The Edges paired with Black Shadow, Sheek White, and Garden Teal Party:
Gelish Trends Swatch: Rough Around The Edges


Gelish Trends Swatch: Sweet 16
Unlike the other glitter polishes with their large, hexagonal pieces of glitter, Sweet 16 is full of really small glitter pieces. It comes off as a pink glitter but it has many shades of pink, silver, and even a touch of blue glitter mixed in. Here's 1 coat of Sweet 16 paired with Black Shadow, Sheek White, and It's A Lily:
Gelish Trends Swatch: Sweet 16


Gelish Trends Swatch: Candy Shop
Here we go with another non-glittery confetti polish. Candy Shop has blue and green hexagonal pieces and takes a few coats for decent coverage. Not one of my favorites, but cool because it's different. Here's 2 coats of Candy Shop paired with Black Shadow, Sheek White, and Don't Be Such A Sourpuss:
Gelish Trends Swatch: Candy Shop


Gelish Trends Swatch: Am I Making You Gelish?
Am I Making You Gelish? is a really dazzling silver glitter polish that has fantastic coverage for a glitter topper. It's loaded with holo glitters as well and has looked really amazing on the winter manicures I've done. Here's 1 coat (just one coat!!) of Am I Making You Gelish? paired with Black Shadow, Sheek White, and Go Girl:
Gelish Trends Swatch: Am I Making You Gelish?


Gelish Trends Swatch: Too Tough To Be Sweet
Too Tough To Be Sweet is another really dense glitter polish in a really gorgeous fuschia color. Here's 2 coats of Too Tough To Be Sweet paired with Black Shadow, Sheek White, and Black Cherry Berry:
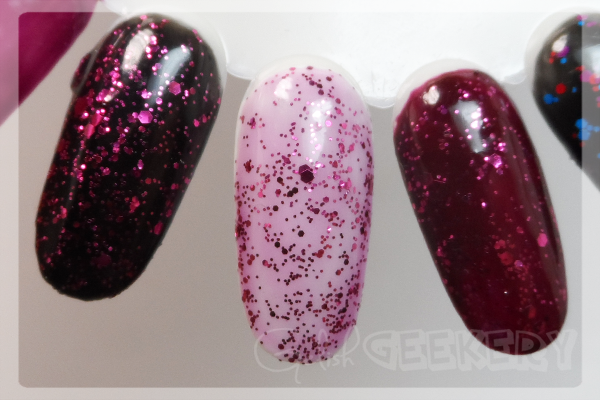
Gelish Trends Swatch: Too Tough To Be Sweet


Gelish Trends Swatch: Let Me Top You Off
Another what I would call "confetti" polish. Let Me Top You Off doesn't have any shiny glitter, but rather matte hexagonal red, blue, and purple pieces in multiple sizes. Here's 2 coats of Let Me Top You Off paired with Black Shadow, Sheek White, and My Favorite Accessory:
Gelish Trends Swatch: Let Me Top You Off
I've already covered these next colors, but I'll include them here. I think I'm done buying Trends polishes, so this should be my last post on the matter ;) Click on the images to go to my original post about the color.
Gelish Trends Swatch: Life Of The Party
Gelish Trends Swatch: A Pinch Of Pepper
Gelish Trends Swatch: Feel Me On Your Fingertips
Gelish Trends Swatch: Concrete Couture