Showing posts with label Shopping Trip. Show all posts

Friday, November 1, 2013

Last night it finally happened.

I've been calling all the Sallys in the area for the past 2 weeks asking them if they have any of the new Gelish Nail Art Kits, and in all instances I got, "Not yet". Last night we wandered into a Sallys and asked them if they had any of the kits... lo' and behold! They had all three!! I picked up the foil kit and plan on putting up a review next week (although it'll probably be on a swatch wheel. I'm doing Adventure Time nails tonight and I wanna keep them on for a while ;)

I also just googled the nail art kits and finally found a description on the NailIt site! It must be new, cuz I've been searching for info on these kits! They have a French Manicure, Glitter, and Foil kit, and all kits come with 2 mini polishes as well as the supplies you'll need to create the nail art. I'm really excited about the foil nail art kit and am crossing my fingers that Sally's will have some kind of awesome Black Friday deal so I can get the glitter kit as well!

I also picked up some more acrylic paints. After my previous foray into using acrylic paints for nail art I gave up, but I decided to purchase a better brand and give it another go. I'll be writing up the results on that as well. ;)

Update 11/8/13: The Gelish Foil Nail Art Kit Review is up!

Saturday, October 12, 2013

Gelish Matte Top It Off Black Shadow Manicure I picked up more Gelish Trends polishes and have swatched them up! I had REALLY wanted to pick up the new Gelish Foil Nail Art kit, but I called 4 different Sally's in the area and NONE of them had it. Once I get my hands on one I plan on writing up a full review with pics. :)

Additionally, my lady requested a black matte manicure inspired (alright, straight up copied!) by one she saw on Pinterest.

By Sun Dancer at SolensDanserinde.blogspot.com
I was able to use the new Gelish Matte Top It Off. I love it, so, so much. Her manicure is just 2 coats of Black Shadow and one coat of Matte Top It Off.
Gelish Matte Top It Off Black Shadow Manicure
The Gelish Trends colors I picked up are Pinch of Pepper, Concrete Couture, and Feel Me On Your Fingertips (check out my Life of the Party swatch here!) A Pinch Of Pepper is AWESOME. Look at it on the black - it just turns into white polka-dots (and I'm sure it looks like black polka dots on white polish). It isn't glitter, really. It's more like confetti, I guess. It kind of reminds me of an eggshell or Robin's egg.
Gelish Trends Pinch Of Pepper Swatch. 1. Pinch of Pepper; 2. Black Shadow & Pinch of Pepper; 3. Medieval Madness & Pinch of Pepper; 4. Seafoam & Pinch of Pepper;
1. (2 coats) Pinch of Pepper, (1 coat) Top It Off
2. (3 coats) Black Shadow, (2 coats) Pinch of Pepper, (1 coat) Top It Off
3. (3 coats) Medieval Madness , (2 coats) Pinch of Pepper, (1 coat) Top It Off
4. (3 coats) Seafoam, (2 coats) Pinch of Pepper, (1 coat) Top It Off
Concrete Couture is a lot darker than I thought it would be. It's loaded with a very, very dark silver/grey glitter. It reminded me a bit of Showstopping, hence the comparison swatch.
Gelish Trends Concrete Couture Swatch. 5. Concrete Couture; 6. The Naughty List; 7. Showstopping; 8. Black Shadow & Concrete Couture
5. (3 coats) Concrete Couture, (1 coat) Top It Off
6. (3 coats) The Naughty List, (1 coat) Top It Off
7. (3 coats) Showstopping, (1 coat) Top It Off
8. (3 coats) Black Shadow, (2 coats) Concrete Couture,  (1 coat) Top It Off
Lastly is Feel Me On Your Fingertips, a goooorrrgeous glitter purple. I wish I owned Princess Tiara, because I think it'd look AWESOME over that color! In retrospect, I bet it'd look pretty good over Cocktail Party Drama... should've swatched it over that one!
Gelish Trends Feel Me On Your Fingertips Swatch. 9. Feel Me On Your Fingertips; 10. Plum And Done & Feel Me On Your Fingertips; 11. Don't Be Such A Sourpuss & Feel Me On Your Fingertips; 12. Black Shadow & Feel Me On Your Fingertips
9. (3 coats) Feel Me On Your Fingertips, (1 coat) Top It Off
10. (3 coats) Plum & Done, (2 coats) Feel Me On Your Fingertips, (1 coat) Top It Off
11. (3 coats) Don't Be Such A Sourpuss, (2 coats) Feel Me On Your Fingertips, (1 coat) Top It Off
12. (3 coats) Black Shadow, (2 coats) Feel Me On Your Fingertips, (1 coat) Top It Off


Check out more Trends and Matte Top It Off swatches over here!

Friday, October 4, 2013

Guys.

GUYS.

I got the Gelish Matte Top It Off AND one of the new Trends colors, Life of the Party!!
I went by Sally's tonight and, lo and behold, they had the Trends and Matte polishes!! They didn't have any of the display bottles out, but I asked them and they pulled them out from behind the counter. Even better? They're having a deal: buy 2 Gelish mini polishes, get a free Top It Off mini, which is PERFECT cuz I'm almost out!!

So, I kinda got overwhelmed in the store and geeked out so hard I gave myself a headache. I think the girl behind the counter was slightly amused, but because I was geeking out I didn't think to ask her to have a look at ALL the colors in-person. I just looked at the display pictures of the polish colors and picked one. I'm definitely going back this weekend for more colors. MOAR.

In the meantime, here are a couple swatches for comparison!
Gelish Matte Top It Off Swatch. 1. Black Shadow; 2. Black Shadow & Gelish Matte Top It Off; 3. Black Shadow & Orly Matte Top Coat
1. (2 coats) Black Shadow, (1 coat) Top It Off
2. (2 coats) Black Shadow, (1 coat) Gelish Matte Top It Off
3. (2 coats) Black Shadow, (2 coats) Orly Matte Top Coat
Gelish Trends Life Of The Party Swatch. 4. Red-Y And Waiting & Life Of The Party; 5. Life Of The Party; 6. Tumberline Violet
4. (2 coats) Red-Y And Waiting, (2 coats) Life Of The Party
5. (3 coats) Life Of The Party
6. (3 coats) Tumberline Violet

I personally LOVE the Gelish Matte Top It Off. The Orly Matte has a bit of a cloudy quality to it compared to the Gelish Matte. Also, the matte effect isn't apparent until you cure and wipe with Cleanser. And Life of the Party has a nice, thick consistency and is LOADED with glitter. Love!! I can't wait to pick up more!!

Check out more Trends and Matte Top It Off swatches over here!

Sunday, September 8, 2013

Gelish Star Trek Nerd Nails We've been watching a lot of Star Trek: Voyager lately.

A LOT.

I was a HUGE fan in High School when it originally aired, but I've just now gotten my GF into it. She LOVES 7 of 9 (and not for the obvious reasons).
Watching it now makes me appreciate it on so many more levels. You don't realize how poorly women are written in television/movies until you watch a show that writes strong, independent, respected women -- and does it RIGHT. I'm a little sad we've already started season 7.

So, since my GF is all Trek, all the time right now, she requested Star Trek nails! These were a LOT of fun and marked a lot of firsts for me:
  • First time trying Gelish Galaxy Nails
  • First time trying a non-Gelish gel polish
  • First time painting nail art before applying Top It Off
  • First time layering "regular" polish with Gelish polish
Whew! This is gonna be a long post.

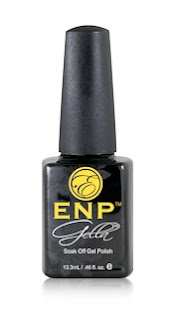
So, IMO, Gelish's yellow selection... sucks. Unless you want neon yellow (Coco Cabana Banana) or greyish yellow (Don't Be Such A Sourpuss) you're out of luck. Unfortunately for my GF yellow is her favorite color. So, while we were out at a nail salon supply store she decided to pick up a bright, beautiful canary yellow from a gel brand I've never used or heard of. We grabbed Gella by ENP in "Lily".
ENP Gella Lily
The gal at the shop actually told us the brand wasn't that great, but didn't say why. I told her we really just wanted a bright, canary yellow, and our options are limited with gel polish. The polish itself was a bit watery and it took me 3 coats to get full opacity. I put it over a layer of Sheek White in the hopes that it might minimize whatever problems the polish might have (hopefully it isn't fading) but so far I have no complaints. It seemed to work well with the Gelish polish, Top It Off, and the 18G lamp.

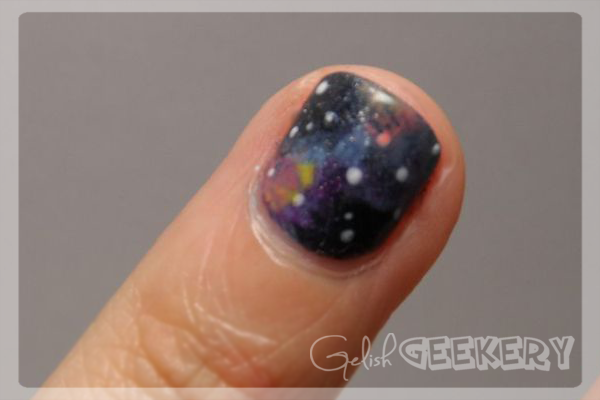
As for the galaxy nails... I've been DYING to do these for, like, a year, but I've been SO intimidated by it. I don't know why, but I've just felt like I was doomed to fail.
Gelish Galaxy Nail
However, I have to say... it was easy! On the second nail I really got the hang of how it should look to make it look more like a nebula and less like a multi-colored marble ;)

I also decided to try something new: rather than apply Top It Off before begining painting details, I wiped off the tacky layer off the cured polished and then began painting with Gelish polish. I'm happy to report that I did NOT expirence the color "bleed" once I began painting! I'm going to keep expiramenting with this method - saves me Top It Off and time under the lamp :)
Gelish Star Trek Nerd Nails
For the above manicure I did the following:

Index, Middle, and Pinky Nails:
  1. Index: 2 coats Backstage Beauty
    Middle: 1 coat Sheek White, 3 coats Gella "Lily"
    Pinky: 2 coats My Favorite Accessory
    cured all coats
  2. 1 coat TIO, cure
  3. Applied striping tape to create triangle shapes
  4. 2 coats of Black Shadow, cured all coats
  5. 1 coat TIO, cure (in retrospect, I probably could've skipped this step and wiped the cured, tacky polish layer instead)
  6. Dabbed Foundation onto the TIO and pressed the studs in, cured
  7. Painted on the comm badge using Sally Hansen Hard As Nails Xtreme Wear "Golden-I" and Konad Silver polish, let air dry
  8. Finished with 2 coats of TIO, cured all coats
Thumb Nail:
  1. 2 coats of Is It An Illusion, cured all coats
  2. 1 coat Little Miss Sparkle, cure
  3. Wipe off tacky layer with Cleanser
  4. Paint a small blue circle with Up In The Blue, cure
  5. Paint over the blue circle with Twinkle, cure
  6. Wipe off tacky layer with Cleanser
  7. Paint the gold accents with Sally Hansen Hard As Nails Xtreme Wear "Golden-I", let air dry
  8. Finished with 1 coat of TIO, cured
Ring Nail:
  1. 2 coats of Is It An Illusion, cured all coats
  2. 1 coat Little Miss Sparkle, cure
  3. Wipe off tacky layer with Cleanser
  4. Applied a dab of Up In The Blue to the corner of a make-up sponge and sponged the color on where I wanted it, cured
  5. Continued to sponge color on with Starburst, Sweet Morning Dew, and Gella "Lily", curing after each color application
  6. Dotted small "stars" on the nail with Sheek White
  7. Finished with 1 coat of TIO, cured

Friday, August 23, 2013

Last week, I turned 30.

That's kind of a loaded age, right? It's the first time in your life you pass into a new decade without that sense of optimistic expectation and that's just... that's heavy.

LUCKILY I have a ton of awesome new Gelish goodies to help me ring in the new decade! First off, this past weekend Sally's was offering 50% off clearance PLUS I had a special birthday coupon, so I got the following 6 Gelish polishes... for $20. Rock 'n' roll, baby.

Lust At First Sight

My Nightly Craving

Double Shot Espresso

A Mint Of Spring

Sweet Morning Dew

Plum And Done
I'm excited about that Sweet Morning Dew and the Under Her Spell colors I picked up! AND because I'm feeling super awesome and am finally getting excited about the Under Her Spell colors, I went ahead and swatched them for you. :) I wanted to do some comparisons. I really thought Lust at First Sight was going to be more purpley, but it's quite brownish. It reminds me of something, like a fruit or veggie, but I can't put my finger on it...

Gelish My Nightly Craving Swatch
1. (2 coats) My Nightly Craving, (1 coat) Izzy Wizzy
2. (2 coats) My Nightly Craving, (1 coat) June Bride
3. (2 coats) My Nightly Craving, (1 coat) Tumberline Violet
4. (2 coats) My Nightly Craving
Gelish Lust At First Sight Swatch
4. (2 coats) My Nightly Craving
5. (2 coats) Glamour Queen
6. (2 coats) Lust At First Sight
7. (2 coats) Cocktail Party Drama
8. (2 coats) The Perfect Silhouette
9. (2 coats) Plum And Done
Notice how much brighter my Plum And Done was on the wheel, compared to Chickette's swatch? No idea why that is...

Next up I got this super-crazy-awesome double-sided case for my Gelish polish from my bff!! I guess it's actually meant for thread spools, but the big Gelish bottles fit PERFECTLY and the minis easily double up!
Gelish Case
And possibly best of all... I got the mother of all Gelish lamps from my GF, Mom, and Gma... the 18G!!!
Gelish 18G Lamp
How did I ever live without this thing *_* It's SO FAST. No more 2 minute cures... 30 seconds and I'm ready to go! This is gonna be GREAT for the detail I know I'll want to get into!

Sunday, July 28, 2013

A coworker of mine is getting married and was lamenting the fact that her normal nail salon didn't have any neutral colors available for her wedding day. She didn't really want to go with a french manicure and I thought, well, I have a ton of polishes and some nice neutral shades... why don't I swatch some up for her and let her borrow my colors so her nail lady can apply them professionally?

So I stopped by a Sally's I hadn't yet visited to pick up a swatch wheel and - of course - I had to check out their clearanced Gelish... Jackpot!!! I found four more colors I didn't have - 3 at $10.95 and 1 at $8.95. But, when they rang them up, I got one for $8.95, one for $7.95, and 2 for $4.95... MEGA JACKPOT!!!


The colors I picked up completed some of my Gelish collections, too. So double woot!!


Izzy Wizzy, Let's Get Busy

Fashion Week Chic

Angel In Disguise

Garden Teal Party

So I swore up and down this wouldn't be a blog for swatches, but seeing as I did swatch a bunch of neutral Gelish combinations, I thought I'd throw them up for anyone who was curious.

Gelish Skinny Vanilla Latte Swatch
1. (3 coats) Skinny Vanilla Latte
2. (3 coats) Skinny Vanilla Latte, (2 coats) Night Shimmer
3. (3 coats) Skinny Vanilla Latte, (2 coats) June Bride
4. (3 coats) Skinny Vanilla Latte, (2 coats) Twinkle
Gelish Glamour Queen Swatch
5. (3 coats) Glamour Queen
6. (3 coats) Glamour Queen, (2 coats) June Bride
7. (3 coats) Glamour Queen, (2 coats) Night Shimmer
8. (3 coats) Glamour Queen, (2 coats) Izzy Wizzy, Let's Get Busy
Gelish Sheek White Swatch
9. (2 coats) Sheek White, (2 coats) Night Shimmer
10. (2 coats) Sheek White, (2 coats) June Bride
11. (2 coats) Sheek White, (2 coats) Izzy Wizzy, Let's Get Busy
12. (2 coats) Sheek White, (2 coats) Little Miss Sparkle
Gelish Cashmere Kind Of Gal Swatch
13. (1 coat) Sheek White, (2 coats) Cashmere Kind Of Gal, (2 coats) Night Shimmer
14. (1 coat) Sheek White, (2 coats) Cashmere Kind Of Gal, (2 coats) Izzy Wizzy, Let's Get Busy
15. (1 coat) Sheek White, (3 coats) Danny's Little Helpers, (2 coats) Twinkle

Friday, July 19, 2013

I've been having fits all week, ranging from anger, to sadness, to deep longing over the fact that we weren't able to get tickets to San Diego Comic-Con this year. I was tormenting myself yesterday by searching #sdcc on Twitter and Instagram. I found a live blog of the Dreamworks panel and, man, they showed extended clips of How To Train Your Dragon 2!! I'm probably looking forward to this movie more than Star Wars, Star Trek, Wolverine, Catching Fire, and pretty much every other nerdy movie combined. Ugh. My love for HTTYD runs deep.


So, I think in an unconscious effort to fill the Comic-Con void, I went nail art/polish CRAZY this week!

First off, I'm officially 100% obsessed with Japanese Nail art (check out Hana4 on Instagram to see what I'm talking about!). So I raided eBay for nail studs and art that might help me replicate some of the awesome Japanese nail art I've been seeing.

Here's what I splurged on (click on the images to check out the item on eBay!):

I'm SO. EXCITED.

Then, I sat at work and drew out sketches on Post-It notes of the nail art I plan on doing on my GF and I this weekend. Does anyone else do this or otherwise plan out their next mani?


GF's next mani. I think these sketches only make sense to me…

Then last night I decided I needed to go to Sally's and pick up a 180 grit file. Of course I checked out the clearance Gelish, but there weren't any new colors. Then as I walked past the normal Gelish display, I noticed a number of colors were on sale for $10.95! So a $2 shopping trip turned into a $30 shopping trip, and I picked up…

Up In The Blue

Medieval Madness

Night Shimmer

Up In The Blue has been on my want list for a while! So I'm pretty stoked :D

And now, I need to sink into poverty for the rest of the month >.>

Monday, June 24, 2013

Gelish Polish ORLY Matte Topcoat Last weekend the GF and I decided we absolutely HAD to have a nude-colored Gelish polish for the manicures we were planning on doing, so we hustled our butts over to Sally's to check out their Gelish Mini offerings (normally I prefer buying the full-sized bottles off Amazon for the same price as Sallys sells the minis, but instant gratification won over). My GF had fallen in love with a simple manicure she'd seen on Pinterest:


From mademoiselle-emma.blogspot.be

We decided on Skinny Vanilla Latte and noticed a sign saying if you bought a polish at full price you could get a red tagged polish for 50% off. I bee-lined it over to the red tagged polishes and was thrilled to see they had ONE color from the Love In Bloom collection, A Petal For Your Thoughts. I've been salivating over that whole collection, so I was excited to pick it up for $5!! We then noticed that the ORLY Matte Topcoat was also on sale. I love the matte look and, while I know manicurists have been creating a matte finish on Gelish by buffing the Top It Off shine, I'm lazy and inexpirenced and thought a matte topcoat would be waaaaay easier.

I haven't seen anyone definitively say whether any of the matte topcoats work over Gelish, and I'm here to give a definitive answer: YES, matte topcoats (at least the ORLY one) defintely work over Gelish Top It Off:

Gelish Polish ORLY Matte Topcoat

(Please forgive the meh-ness of this manicure -- it was the one we tested out our new LED lamp with. Oy.) Being a bit androgynous, my GF enjoys a slightly more masculine look on her nails - nude colors, sharp lines, stripes... I think the matte topcoat does a nice job of de-girlifying her look. You can se some shiny spots where I missed with the matte topcoat, but overall it dulled the nails quite nicely. I'm excited to mix the matte topcoat with shiny Top It Off accents in future manicures (especially with a lamp that works >.<). For the manicure above I did the following:
  1. One coat Sheek White
  2. 2 coats Skinny Vanilla Latte
  3. 1 coat Top It Off
  4. Added striping tape, then 2 coats of Black Shadow
  5. 1 coat Top It Off
  6. Wipe off TIO and applied the ORLY Matte Topcoat