Showing posts with label Tips & Tutorials. Show all posts

Sunday, January 12, 2014


I should probably preface this by saying this fix will work for us Gel Polish users, but I can't recommend it for Regular Nail Polish users.
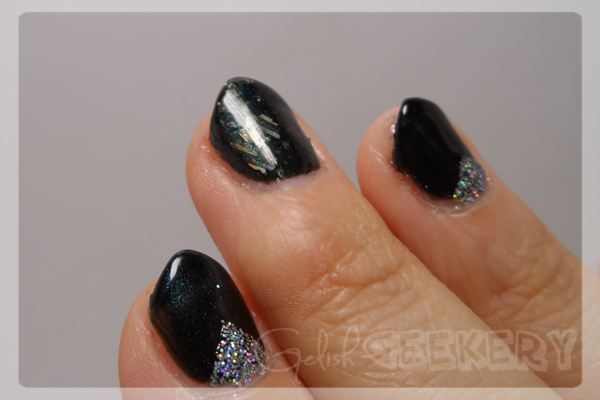
Gelish Striping Tape No Lifting
I love striping tape. It gives an added crispness and a professional edge to almost any manicure, imo. My only problem with it? IT PEELS. Even under 2 coats of Top It Off striping tape will peel. I found that under Top It Off, after a couple of days a clear film would start to lift and separate from the adhesive side of the tape, and it was downhill from there.

I'd basically ruled striping tape out as a leave-on nail art accessory... until now.

Back in December I was doing a set of nails for my coworker and was moaning and groaning because I wanted to include striping tape but always had such bad results. She looked at me and said, "why don't you put the Structure gel over the tape?"

How had I never thought of that!? I put silver tape down, slapped on a layer of Gelish Structure, and 3 weeks later the tape was secure and pristine on her nails without one hint of a lift! I also ran a second experiment with my fiancée. On day 16 she soaked her nails off and there was absolutely no lifting on the nail tape.

Now, I'm unsure if it'll cause color bleed/fade on colored metallic tapes, but the silver tape was perfectly fine.

Here's how I did it:

  1. 1. Do your typical nail prep, Foundation, and color coats.
  2. 2. Before putting your striping tape down, wipe the cured color polish with Cleanser. You could always cure a coat of Top It Off and THEN Cleanse, but either way you need to remove that tacky layer. I've been applying the tape without first curing a coat of Top It Off. Either way, if you DON'T wipe the tacky layer, the striping tape WILL NOT STICK.
  3. 3. Lay down your tape as you wish. Scrub your nail over the tape to really make sure it's stuck down with no lifting. TIP: Don't lay the tape all the way to the edges. Give yourself just enough room to fully cover the ends of the striping tape with more coats of polish.
  4. 4. Apply a layer of Gelish Structure across the entire nail, making sure to completely cover the ends of the tape, cure.
  5. 5. Continue with your nail art or apply Top It Off, cure, Cleanse, done!

If you have any questions feel free to ask in the comments. I really hope this helps people out!

Friday, November 8, 2013

Gelish Foil Nail Art Kit Review So, I spent the better part of October relentlessly hounding every Sally's Beauty within a 15 mile radius of my home, calling and asking when they were going to get the new Gelish Nail Art Kits in. It wasn't until October 31st that I went into a Sally's, asked if they had any of the kits... AND THEY DID!!
I've been particularly interested in the Foil Nail Art Kit, as foil nail art was something I've never tried but had always been curious about. I bought the kit without knowing anything about it, other than that it existed, so I eagerly opened up the kit the second I got in the car to see what was inside.
Gelish Foil Nail Art Kit Review
This seems silly in retrospect, but I had no idea the kit would include polish! The kit comes with:
  • 1 Gelish Black Shadow mini polish
  • 1 Gelish Black Cherry Berry mini polish
  • 10 different foil sheets
  • 1 wooden cuticle pusher stick
  • A How-To booklet
I was excited about the Black Cherry Berry (yay! new colors!) but, being completely new to foil nail art, I looked at the foil sheets and thought, "Hmm, that doesn't seem like much..." We'll revisit that thought later. ;)
Gelish Foil Nail Art Kit Review
After ogling my new polish I wanted to look through the booklet and see how difficult the process would be. (If you're curious, the QR code leads here: thefoilnailartkit.gelishminis.com) The answer: not difficult at all! It's a 6-step process (well, 3, really) that I'll walk through with you. My fiancée volunteered to be the guinea pig on this little experiment. :)
Gelish Foil Nail Art Kit Review
2 coats of The Dark Side

First up, apply 2 coats of your base coat. The directions use the included Black Shadow, but we went with The Dark Side (which, by the way, is WAY more gorgeous than I've ever given it credit for! It's a lovely blue/green/purple/teal.) The instructions then say to let the polish sit on your nails for a full minute after curing the second coat to "let the tacky layer thicken". Truthfully, I had no idea the tacky layer thickened...
Gelish Foil Nail Art Kit Review
Foil scrubbed into the tacky layer with my nail

Next, apply the foil silver side down (colored side up) to the tacky polish layer and press into the polish. I did the initial press and lifted the foil to find only a couple teensy pieces of foil had transferred onto the nail. I pressed the foil back down and began to scrub across it with my thumb nail to REEEALLY transfer the foil into the nail and was happy with the result. I was also suprised by how little foil actually transfers off the foil sheets, so my previous concern about the size and quantity of the foil sheets is moot.
Gelish Foil Nail Art Kit Review
Only a tiny corner of the foil sheet transferred to the nail

Next up, their instructions say to apply a thin coat of Black Cherry Berry over the foil, but I went with another thin coat of The Dark Side. That extra coat of polish really gives the foil a nice, finished look. Before putting the extra coat of polish on it just kinda looked like I'd tried to peel a sticker of my nail and some of the glue and backing was left behind.
Gelish Foil Nail Art Kit Review
A thin coat of The Dark Side completely changes the look of the foil

You finish off with TIO and Cleanse, as usual, and here is our final look:
Gelish Foil Nail Art Kit Review
All in all it was really fun, quick, and easy! It's definitely a simple way to add a little extra pizzaz to your nails. This seems like a really good kit for someone who is just starting their Gelish collection, something you could get in addition to the Basics kit and a couple of colors. I'll be curious to see what kinds of nail art I can do with the foil. :)

Feel free to ask me any questions in the comments (and, since this is my first review, let me know if I missed any important points/concerns!).

Thursday, November 7, 2013

Gelish Tribal Dreamcatcher Mani with Migi Nail Art Pens This past weekend my coworker came back over for her next manicure. She wanted some tribal nails and a dreamcatcher nail, so I ordered a stamping plate with a tribal design and figured I could free-hand the dreamcatcher. Unfortunately, the stamping plate didn't arrive in time >:( I decided to take the opportunity to really try out the Migi Nail Art Pens I bought last month and see how much control and detail I could get out of them.
Migi Nail Art On Gelish
I was very happy with the results! I used the black and white Migi pens for all the details on this manicure and was REALLY happy with the amount of control I had with the pens. I enjoyed using these much more than using brushes - AND they shaved about 40 minutes off the manicure. They were super quick and super easy! I'm excited about buying up some more colors -- I feel like these will open up a whole new world of nail art. :D
Gelish Tribal Dreamcatcher Mani with Migi Nail Art Pens
I took the pic with my phone, so the quality is fairly meh. I used Gelish Garden Teal Party and Lust At First Sight for this mani and I topped the nail art with TIO. For the index finger I was trying to create that turquoise stone effect I've been seeing more and more.

By lacquerstyle

I think when people do the effect on regular polish they put a drop of black polish in a glass of water, as if to watermarble, spritz it with hairspray, and the alcohol in the hairspray causes the polish to "crackle" across the surface of the water. You then dip your turquoise-painted nail in and - ta-da! Instant turquoise stone effect. I didn't have the time to test this effect out on Gelish polish, so I freehanded it with the nail art pens. I need to put this on my 31-day Nail Art Challenge list...

Monday, November 4, 2013

Alright, I'm REALLY excited to share this with you guys. I've looked all over for a tutorial on how to fix a chipped nail - not chipped nail polish, not a ripped piece of nail that's still attached, but how to fix a nail where a corner or piece has completely broken off and you're left with your only option: filing the whole thing down and starting over.

That's the kind of break I'm talking about. I've been trying to grow out my nails into a square shape but every time I've got them at just the right length... a corner of my nail chips off (biggest offenders are the thumb and index nails on my right hand.)

So, I did some experimenting with the Gelish Structure I picked up and... by Jove it works! I wore a "fixed" nail for a week with ZERO problems or lifting. Now, for this tutorial I had to improvise since my nail forms hadn't yet arrived, so I used a plastic nail I snapped off from a nail swatch wheel. It did the job, but a form would be MUCH more convenient. I should also note that this is a fix for aesthetic purposes rather than structural. I'm not sure how this fix would hold up if you applied pressure to it, ie: opening a coke can with the fixed part of your nail. It works wonders for making your manicure look even, though! ;)

I hope this helps someone else out! Feel free to leave me a comment with any questions :)
Gelish Structure Broken/Chipped Nail Tutorial by Gelish Geekery

Tuesday, September 24, 2013

Gelish Fall Nail Tutorial So, this has been an interesting couple of weeks!

I did a new fall-inspired mani on myself last weekend and posted it to Instagram with the intent of doing one of my usual write-ups on it. However, before I got the chance to write up a post I received a comment on my Instagram account from NailPro, asking me to do a tutorial on those nail!

Uh, OKAY.
So this past weekend I worked on a photo tutorial for the nails and sent it in... and they decided to use it!!! Check this shiz out!!

NailPro.com: Gelish Fall Nail Tutorial >>

Gelish Fall Nail Tutorial
They've also asked me to write up a general tutorial on how to use Gelish which I plan on submitting this weekend. Files this under Super Exciting Stuff!

Wednesday, August 7, 2013

Gelish Nail Art DC Comics Earlier this year the GF and I decided to go to Wondercon in Anaheim. After a lot of bribing and urging on her part, I decided to cosplay as Marceline to to her Finn. I spent a week buying supplies and outfit essentials, then handmade myself a little stuffed Hambo.

I LOVE my Hambo. I can't even.

I also decided I HAD to do DC-inspired Gelish nerd nails, because we're big into the Bat family - and appreciate the other guys, too ;) In retrospect it was a silly thing to do since my costume required gloves, but it taught me some important tips for painting nail art with Gelish.

Gelish Nail Art DC Comics Gelish Nail Art DC Comics

My previous attempts at trying to paint detail with Gelish left a LOT to be desired. The colors would just all run together into amorphous shapes, so I gave up on trying to use Gelish polish to paint designs. In my great wisdom, I went to Michael's and picked up a cheap, $5 set of acrylic paint. Like, painter's paint. I thought that, with a couple coats of Top It Off, I'd have the control and detail I wanted with the lasting power of Gelish.

So I sat and spent a couple hours carefully painting Batman, Red Robin, Red Hood, Flash, Superman, ect. symbols onto my nails. I applied a couple coats of Top It Off and admired my shiny new nails for the day.

Then, that night I hopped in the shower.

I paused at one point to look down at my hands... ALL THE DESIGNS HAD WASHED OFF.

Over the next couple of days I went through the 7 stages of grief, then in the end I decided I'd try again. Although the paint had washed off, it left a faint outline of the original design on the nail. Maybe, by using that as a guide, I could paint with the Gelish polish. As I started painting with the Gelish polish, I noticed that the bleeding effect was completely gone and I had really good control. I finished up my manicure and kept it on for a couple of weeks (got tons of compliments, too!).

After more testing I finally realized: it was the Top It Off that made the Gelish workable. Before apply and curing TIO, the Gelish polish will just bleed together. Once you've slapped a TIO coat on, cured it, and wiped with Cleanser the Gelish polish paints surprisingly well! This is one of the reasons I've developed a motto when doing Gelish nail art: when in doubt, Top It Off!

Tips For Using Gelish To Paint Nail Art
  • Decide on a base color. Do a normal Gelish manicure with your basecolor and finish it up with a cured layer of Top It Off, and wipe with Cleanser
  • You can use inexpensive nail art brushes like these to paint your design with Gelish polish
  • For watery Gelish formulas, put a couple drops of polish onto piece of foil and cure it under your lamp (10 seconds or so for a UV and only 2-4 seconds under a good LED). This thickens up the polish without fully curing it and makes it much easier to control
  • Don't be afraid to use NON-acetone remover on cured designs to help you clean up the art. Sometimes it helps me get that last bit of detail down
And if I ever come up with more tips, I'll be sure to update this list. :)

Sunday, July 21, 2013

Gelish Watermarble and Watercolor This week I decided to try something I've been DYING to try: a watermarble with Gelish polish. Now, I've seen people extolling the joy of Gelish due to it's ability to easily dry marble, and while the dry gel marbles are really cute in their own right, they just aren't the same as a watermarbles. I just love those loops and swirls of color that swoop nonsensically across the nail.

MuckingFusser Watermarble
By MuckingFusser, the watermarble Queen

I'd seen a couple YouTube videos showing one could watermarble with Gelish and, this week, I wanted to give it a try myself. I decided to combine my love of watermarbles with my love of Japanese style nail art and I'm officially proclaiming it a success! I had at least 4 fails that I had to take off and redo, but after some trial and error I finally figured it out!

Gelish Watermarble and Watercolor

For the above manicure I did the following:

Ring & Middle Watermable Nails:
  1. • Started off with 2 coats of Sheek White and 1 coat of TIO
  2. • Poured bottled water into a shot glass and wrapped medical tape around my nails to help with the clean-up
  3. • Mixed up Coco Cabana Banana with a bit of Don't Be Such A Sourpuss to get a toned down, less neon yellow
  4. • Alternately dripped the yellow mix, My Favorite Accessory, A Petal For Your Thoughts, and Seafoam into the water. The mixed yellow didn't "spread" in the water as well as the other ones, so less yellow ended up being visible in the final marble. I pulled the polish across the water to get the design I wanted
  5. • I stuck my nail on the part of the design I wanted and kept my finger in the water
  6. • I picked up the UV light and held it over the water for 10-15 seconds, just enough to slightly cure the left over gelish that wasn't on my nail
  7. • I then took a toothpick and gathered up the remaining polish - just like they do in all the tutorial videos. I found this step was actually really, really important: if you just pull your finger back out of the water with the Gelish polish still floating on the surface, that polish will layer back over the nail as you pull your finger out. This'll essentially create two layers of polish on the nail and it'll bubble and wrinkle horribly once you cure it
  8. • I removed the tape from my finger and cleaned up around the nail with an art brush and non-acetone remover
  9. • Cure the nails, TIO, cure again, and you're done!
For the other three nails I was going for that gorgeous watercolor effect I see on so much Japanese nail art. While I like how the watermable and watercolor art turned out, I don't think I'll combine them again. The watercolor is so deleicte and the watermarble so bold that they don't mesh well enough for my tastes.

Hana4 Japanese Nail Art
By hana4, I love her nail art SOMUCH.

Thumb, Index, & Pinky Watercolor Effect Nails:
  1. • Started off with 1 coat of Simple Sheer, TIO
  2. • Then followed with 2 coats of Sheek White, allowed for the half moon peek-a-boo, and TIO
  3. • Dripped spots of my yellow mix, My Favorite Accessory, A Petal For Your Thoughts, and Seafoam onto the nail and, using a small nail art brush, swirled and blotted the colors around until they were blended and mottled-looking. Cured.
  4. • Used craft glitter and small nail art brush to create a glitter line along the peek-a-boo half moons
  5. Used the same small art bush to apply TIO JUST on the glitter. I found that applying TIO like you normally would across the whole nail when the glitter is still loose on the nail will spread some glitter across the nail, and I didn't want that
  6. • Cure, then apply TIO across the whole nail. Cure, apply studs, more TIO over the studs, and done!

Tuesday, July 2, 2013

Over the past few weeks I've been obsessed with finding a very specific nail art stud (more on my epic search on my next manicure) that seems to be readily available in Japan and virtually non-existent here. I decided to go to Yelp to look for local nail salon supply stores - there are a lot of asian communities in my area, so I thought, perchance, one may carry what I was looking for.

While reading through some reviews I saw people warning that some places carry cheap Gelish that are actually fakes. This got me thinking… I can spot a fake Tokidoki bag, but I never thought to even look for fake polish. I didn't even know that was a thing.

To the interwebz!

SalonGeek was, of course, one of the first hits I came across. They cautioned about buying Gelish from "fleBay" and I saw someone mention having a Gelish bottle labeled as "CCO" instead of "Hand and Nail Harmony" - the forum users confirmed that CCO is a Gelish rip-off.

This got me thinking.

When I started all this a year ago, I bought a Gelish lot off of eBay. At that time, I thought that Gelish was just Gelish, like OPI is OPI. I didn't connect Gelish with H&NH until a couple months later (did the same thing with my Chi flat iron & dryer. "WTF is this Farouk crap? Google, go home, you're drunk."). So I dug out the bottles I'd bought off eBay, and guess what?

Gelish Fake CCO
Can you spot the fake?

Yup. So almost all of my Aurora FX and a couple sheer sparkles are fakes.


While being totally bummed out to find I had infiltrators among my legit Gelish collection, I was actually surprised that I'd never noticed anything different about these polishes. The formulas of the impostors range from thick to thin, just like the real ones. They smell the same, cure the same, and seem to last the same amount of time. And the swatches are virtually identical to their real counterparts.

Edit 11/13/13: So I HAVE started to notice that the CCO polishes are starting to thicken and get kind gunky. With one I realized that the neck of the bottle, on the inside, had turned into a thick, jelly layer of polish that I had to pick out and throw away. I haven't seen this with my real Gelish polishes.

Would I willingly buy fakes? No, sir. I'm too much of a snob. But are the fakes bad? So far, my experience has been fine. I'd imagine if you're a professional, using fakes on clients would be a huuuuuuuuuge no-no for a number of reasons. But as a noob who isn't willing to shell out the cash to replace my fakes at this point...

Monday, June 24, 2013

Gelish Polish ORLY Matte Topcoat Last weekend the GF and I decided we absolutely HAD to have a nude-colored Gelish polish for the manicures we were planning on doing, so we hustled our butts over to Sally's to check out their Gelish Mini offerings (normally I prefer buying the full-sized bottles off Amazon for the same price as Sallys sells the minis, but instant gratification won over). My GF had fallen in love with a simple manicure she'd seen on Pinterest:


From mademoiselle-emma.blogspot.be

We decided on Skinny Vanilla Latte and noticed a sign saying if you bought a polish at full price you could get a red tagged polish for 50% off. I bee-lined it over to the red tagged polishes and was thrilled to see they had ONE color from the Love In Bloom collection, A Petal For Your Thoughts. I've been salivating over that whole collection, so I was excited to pick it up for $5!! We then noticed that the ORLY Matte Topcoat was also on sale. I love the matte look and, while I know manicurists have been creating a matte finish on Gelish by buffing the Top It Off shine, I'm lazy and inexpirenced and thought a matte topcoat would be waaaaay easier.

I haven't seen anyone definitively say whether any of the matte topcoats work over Gelish, and I'm here to give a definitive answer: YES, matte topcoats (at least the ORLY one) defintely work over Gelish Top It Off:

Gelish Polish ORLY Matte Topcoat

(Please forgive the meh-ness of this manicure -- it was the one we tested out our new LED lamp with. Oy.) Being a bit androgynous, my GF enjoys a slightly more masculine look on her nails - nude colors, sharp lines, stripes... I think the matte topcoat does a nice job of de-girlifying her look. You can se some shiny spots where I missed with the matte topcoat, but overall it dulled the nails quite nicely. I'm excited to mix the matte topcoat with shiny Top It Off accents in future manicures (especially with a lamp that works >.<). For the manicure above I did the following:
  1. One coat Sheek White
  2. 2 coats Skinny Vanilla Latte
  3. 1 coat Top It Off
  4. Added striping tape, then 2 coats of Black Shadow
  5. 1 coat Top It Off
  6. Wipe off TIO and applied the ORLY Matte Topcoat

Sunday, June 23, 2013

Last week I ordered some nail art pearls off Amazon. When I first saw people use them I poo-poo'd them as just being TOO much, but DAMN some of those manicures look so ELEGANT! I used the new nude Gelish color we just got and went to town!

Gelish Skinny Vanilla Latte
Gelish Skinny Vanilla Latte Gelish Simple Sheer
For this Gelish mani I used:
  • A base coat of Sheek White on all but the pinky nails
  • 3 coats of Skinny Vanilla Latte on all but the pinky nails
  • 2 coats of Simple Sheer on the pinky + Skinny Vanilla Latte and Sheek White for the little flowers
  • Nail pearls
  • Gold striping tape
  • Gold square nail stud
  • Some gold craft glitter I found on sale at Michaels
This manicure marked a couple of firsts for me:
  1. First time scrubbing in glitter
  2. First time using the pearls
  3. First time using Gelish polish to create nail art (more than polka dots or stripes, anyway)

1. Scrubbing Glitter In

So this was way easier than I had made it out to be. I took one of my nail art brushes, stuck it in the bag full of glitter, and brushed it right on to the nail. It was crazy simple and fast. I actually had way too much glitter on the brush than I needed - a little really does go a long way.

2. Using Nail Pearls

I'd recently read an awesome guest post on Chickette's blog that suggested using the foundation to apply nail studs and 3D art. I tried it out by putting a small dab of foundation on the cured/top-coated nail then placing the pearl on top. The pearl slid around a bit, but once I popped it under the UV light for 2 minutes it stayed put. I'm anxious to see how long it lasts!

3. Gelish Nail Art

Now, my previous attempts at using Gelish polish to actually paint designs on the nail have failed. Horribly. But from what I saw on the internet it was totally do-able. I decided to give it another go today and try painting some really small flowers on the sheer pinky nail. I'd put down my 2 coats of Simple Sheek then began trying to shape the flowers with the Sheek White. The color just bled into an amorphous shape, as I'd previously experienced. I decided to cure a Top-It-Off coat on top of the nail, wiped it clean, then tried applying the Sheek White flowers.

Omg, you guys.


THAT'S WHAT WAS MISSING THIS WHOLE. FRIGGIN. TIME. The polish didn't bleed any more! With Gelish I'm learning a very important rule: When in doubt, Top-It-Off.

One Small Catch

Literally. On my last coat of Top-It-Off on my pinky nail I went too thick and didn't clean it up well. Ever wanted to see what NOT to do with Gelish? Here you go:

Gelish Skinny Vanilla Latte

This is Gelish's Bane (Isildur ain't got nothin' on this). It's lifted where it cured against the skin, creating a delightfull little rivet in which water will travel into and, eventually, cause the whole thing to lift.

I'm giving that pinky nail until Friday, tops.

Other than that, I'm kinda in love with this manicure.
So, as an early B-day present, my lovely GF bought me an LED nail lamp. Up until this point I've been using this:


my cheapo Salon Edge 36W UV lamp and have had a total of... zero problems with it. The two minute cure time can really harsh your gig when you want to do more intricate nail art and layers. It's like, I really want crazy awesome nail art, but do I really want to spend 3 hours doing it? Sweet Brown knows what I'm talking about.

Anyway, I did my research, made sure Gelish could be cured with a non-Gelish LED lamp, found a lamp on Amazon that had good reviews and had reviewers who said specifically that it worked for Gelish, I popped it on my wish list and let the GF know that was the one.

Today, it arrived! My New Lumsing 18W LED Lamp!


My GF was ready for her next Gelish mani, so we sat down and I started polishing away, excited by the prospect of finishing in record time (30 second cure time? Gosh golly this'll be crazy fast!). I cured the foundation layer for 30 seconds... alright, seemed a bit "wetter" than usual, but ok, maybe that's how this works. On to the color! Cure for 30 seconds and... it was still... wet. With the UV light I'm accustomed to the color layer being tacky - you can stick your finger in it and leave a finger print, but it doesn't wipe off. This? this was just wiping off. I bumped the color coat cure times up to 60 seconds, then 90 seconds. When I did her left hand I just left all the coats at 90 seconds, the lamp's max timer setting.

By the end of the manicure I kept the Top It Off under the LED light for two 90-second intervals. When I went to wipe the tacky layer off with the Gelish cleanser... actual color from the color coats came off with it.


Sadly, I think we'll be returning it. I kept the coats super, super thin, made sure I was plugged directly into the wall to ensure the lamp was getting the maximum wattage, played with the cure times... I really don't know what else I could've done, it just wasn't curing like my UV lamp. Maybe I have a defective lamp, maybe the reviewers on Amazon really had 30 second cure times with Gelish? All I know is it didn't work, and it makes no sense to keep it if my cure times are a minute and a half to 2 minutes and still not done. My trusty UV light will work fine.

Now I have my eye on the Gelish 18G for my big 3-0 b-day coming up. Go big or go home.