Showing posts with label Japanese Nail Art Manicure. Show all posts

Monday, November 25, 2013

With Thanksgiving around the corner I wanted one more shot at fall nails. I had purchased these gorgeous gold maple leaf studs from AthenaRose with the express intent of rocking some fall leaf nails. Typically I like to draw out what I want to do on my nails, just stupid little sketches that no one but me seems to understand, but for some reason I was having such. a. hard. time. coming up with a design. I wanted to cram WAY to many colors and arts and effects and it was overwhelming me. I finally said, alright, I want fall colors, glitter, and gold, and came up with something I liked.
Gelish Fall Leaf Nails
Yeah... they're still REALLY busy... but I really like them!! (also, please ignore the amateur hour air bubble on the pinky >.<) I finally tried doing the cut-out/negative space/peek-a-boo effect that's so popular with Japanese nail art ( The Nail Room blog actually JUST posted a how-to on it). It actually wasn't nearly as difficult as I thought it was going to be, although I think practice definitely makes perfect with those. ;)

And, even though I LOVE the way they look... I don't think I can continue to rock the square nails. The corners of my nails are so brittle and break easily, and I feel like I'm having a hell of a time filing them into consistent lengths. Does anyone else have this problem? My pinky and ring finger nails sit far back on my knuckle, whereas my middle and index sit pretty far forward. As a result my pinky & index nail always appear longer than my middle & index. It just drives me crazy. I think I'm gonna try an almond shape next...

For the above manicure I did the following:

Thumb Nail:
  1. • 1 coat Simple Sheer, cure
  2. • Wipe tacky layer. Using a nail art brush, create a moon shape along the bottom of the nail with Black Cherry Berry. Applied 2 coats of color, cure all coats
  3. • Using a nail art brush, create a leaf shape toward the tip of the nail with Double Shot Espresso. Applied 2 coats of color, cure all coats
  4. • Using a nail art brush, fill in the tip of the nail with Orange Cream Dream. Applied 2 coats of color, cure all coats
  5. • Scrubbed a tiny bit of craft store glitter into the tacky layer of the leaf
  6. • Using a nail art brush, dabded a small amount of TIO over the glitter, cure. This will keep the glitter from spreading across the nail
  7. • Dabbed Gelish Structure onto the polish and pressed the studs in, cure
  8. • Finished with 2 coats of TIO, cure all coats

Index Nail:
  1. • 3 coats Black Cherry Berry, cure all coats
  2. • Scrubbed craft store glitter into the tacky layer, creating a gradient effect
  3. • 1 coat All That Glitters Is Gold, cure
  4. • Finished with 1 coat of TIO, cure

Middle Nail:
  1. • 1 coat Simple Sheer, cure
  2. • Wipe tacky layer. Using a nail art brush, created an outline of color with Black Cherry Berry. Applied 2 coats of color, cure all coats
  3. • Dabbed Gelish Structure onto the polish and pressed the studs in, cure
  4. • Finished with 2 coats of TIO, cure all coats

Ring Nail:
  1. • 2 coats Orange Cream Dream, cure all coats
  2. • 2 coats Black Cherry Berry 2/3 down the nail, sponged the color to create a gradient, cure all coats
  3. • 2 coats Double Shot Espresso 1/3 down the nail, sponged the color to create a gradient, cure all coats
  4. • Scrubbed craft store glitter into the tacky layer, creating a gradient effect with 3 different glitter colors
  5. • Finished with 1 coat of TIO, cure

Pinky Nail:
  1. • 3 coats Black Cherry Berry, cure all coats
  2. • Dabbed Gelish Structure onto the polish and pressed the studs in, cure
  3. • Finished with 1 coat of TIO, cure

Wednesday, September 25, 2013

Gelish Dreamcatcher Manicure Awesomesauce tutorial requests aside, I've gotten a few requests to do nails! The owner of the gym I go to is determined to come over and have me to her nails and one of my coworkers is coming over on Saturday to get her nails did. In addition, my BFF is in town! We've been spending the past couple of weekends going out, visiting, and having a good time. I offered to give her a Gelish manicure before she leaves, so we decided she'd come over and we'd have a little nail party. However there was one small problem... I don't really HAVE anywhere to DO nails. Honestly, I just sit cross-legged on the floor at my coffee table and do my nails while watching TV.
I decided to remedy this.

I repurposed an L-shaped desk we weren't using into a handy little nail station. It's PERFECT! Neither my BFF or my roomie had to sit on the floor! ;)

First up, my BFF's nails!
Gelish Japanese Manicure
So, I was really inspired by a set of japanese nails I saw on Pinterest:
Japanese Nail Art
Originally found on ameblo.jp

I loved the colors, the fade, the jewels, and decided to recreate it using My Favorite Accessory, Plum & Done, and Make A Difference. I like how it turned out! However, I really need to figure out the best way to do a fade with Gelish. It's kinda hard and time-consuming. I think I need to practice more on my swatch wheel and figure out the best method.
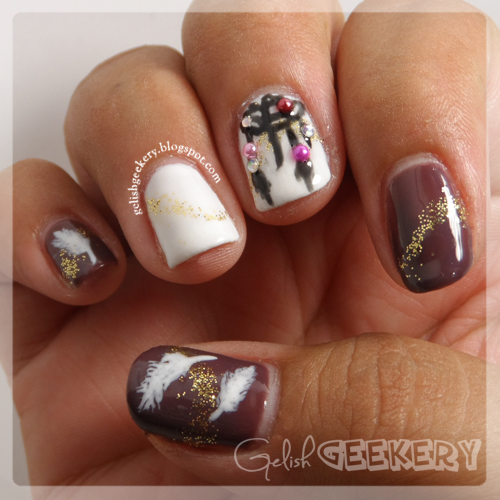
Gelish Dreamcatcher Manicure
For my roomie I tried dreamcatcher nails, using Sheek White, Lust At First Sight, and Black Shadow for the nail art. I love the way these nails look! Although it's apparent I need better nail art detail brushes - the more I look at the dreamcatcher the more critical I am of it. I actually JUST ordered what I hope are better nail art brushes, so I hope if I try something like this again I can get better detail with the Gelish polish. Also, I didn't flash cure the polish on a piece of foil before using it for nail art, so that could've resulted in some messy detail as well.

Tuesday, September 24, 2013

Gelish Fall Nail Tutorial So, this has been an interesting couple of weeks!

I did a new fall-inspired mani on myself last weekend and posted it to Instagram with the intent of doing one of my usual write-ups on it. However, before I got the chance to write up a post I received a comment on my Instagram account from NailPro, asking me to do a tutorial on those nail!

Uh, OKAY.
So this past weekend I worked on a photo tutorial for the nails and sent it in... and they decided to use it!!! Check this shiz out!!

NailPro.com: Gelish Fall Nail Tutorial >>

Gelish Fall Nail Tutorial
They've also asked me to write up a general tutorial on how to use Gelish which I plan on submitting this weekend. Files this under Super Exciting Stuff!

Sunday, September 1, 2013

Gelish Under Her Spell Fall 2013 Japanese Manicure Yesterday I accomplished a huge goal: I completed a 10K race! Now, I've spent my entire life knowing I was and would never be a "runner". January of last year I couldn't jog for more than 30 seconds without wanting to absolutely die and the furthest I'd ever run non-stop was 1/2 mile. When I was 12. So I started training and eventually ran one mile, then I ran a 5K, then I ran a lot of 5Ks and this summer we decided to train for the Disneyland 10K.

How I think I look.

How I really look.
To be able to say I ran a 10K is, like, beyond my comprehension. Even though I was slow (finished in 1:27. Yeah. Not fast) and tired and hot and sweaty... I crossed that finish line! Next on our bucket list, something I've been wanting to do for about a year... we signed up to run the Tinkerbell 1/2 Marathon in January. WHAT ARE WE THINKING!?!? I'm scared and excited and we're just gonna continue on with our training. The best thing about our Saturday morning long runs? The HUGE breakfasts we eat right afterward.
So my reward for myself was... a new Gelish mani!! I've been wanting to use my new Under Her Spell colors, and now that it's September 1st it felt like a good time to get some fall colors on my fingers :)
Gelish Under Her Spell Fall 2013 Japanese Manicure
I really liked the thick consistency of the colors from that collection and I got really good opacity in just 2 coats. Now, I've seen some rumors that My Nightly Craving is a fader, so I think I'm going to take a pic at the end of the week and compare it with the picture I took today. I really hope it doesn't fade - this mauvey pink color is so nice!

I wanted to try to go with a lacey type of theme, but I'm not sure I accomplished it. I have a Konad stamping plate that has a lace design and I had an idea. Now, Gelish does NOT stamp. At all. You can put the polish on the design on the plate and scrape it away, but the minute you press the stamper to the plate to try to pick up the design it just turns into an amorphous streak of color. So I had this idea: what if I apply the Gelish to the plate, scrape it, then flash cure it for 5 seconds under the 18G lamp? Would that give the polish just enough body to transfer? The final verdict is: yes and no. The design actually DID transfer on to the stamper, but it was SO light and faded it wasn't worth putting on the nail. Half the polish transferred onto the stamper while the other half stayed in the design on the plate. It was worth a shot! Maybe next time I can try a slightly longer flash cure and see if that helps.

So because my idea didn't work I had to hand-paint a lace design on my pinky which turned out... ok. I'm really happy with the way the studs look, though!

For the above manicure I did the following:

Thumb Nail:
  1. 2 coats of My Nightly Craving, cured all coats
  2. Dabbed Foundation onto the polish and pressed the studs in, cured
  3. Finished with 2 coats of TIO, cured all coats
Index Nail:
  1. 2 coats of My Nightly Craving, cured all coats
  2. 1 coat TIO, cure
  3. 1 coat Inner Vixen. Without curing, used a bamboo stick (I felt it worked better than the dotter) to create swirl designs that revealed the lighter color underneath, cured
  4. Finished with 1 coat of TIO, cured
Middle Nail:
  1. 2 coats of My Nightly Craving, cured all coats
  2. Applied Inner Vixen to the top half of the nail, spongine it off until I achieved a garadient look, cured. Did this one more time to achieve opacity, cured.
  3. Finished with 1 coat of TIO, cured
Ring Nail:
  1. 2 coats of Lust At First Sight, cured all coats
  2. Dabbed Foundation onto the polish and pressed the studs in, cured
  3. Finished with 2 coats of TIO, cured all coats
Pinky Nail:
  1. 2 coats of My Nightly Craving, cured all coats
  2. 1 coat TIO, cure
  3. Put a few drops of Inner Vixen on foil, cured under 18G lamp for 5sec to thicken it up
  4. Using a nail art brush, hand painted a lace design with Inner Vixen, cured
  5. Finished with 1 coat of TIO, cured

Saturday, August 31, 2013

Well, here we are at the last couple weeks of Summer. Well, okay, technically Summer doesn't end on September 1st but that feeling has stuck with me since I was a kid going off to school.
I've been seeing sooo many cute sunset gradient nails with palm tree silhouettes, and I decided that would be the PERFECT mani to wrap up the summer. It also gave me the excuse to pick up a color I've had my eye on for a while: Sunrise and the City.
I have to say once more, applying and curing Top It Off before painting nail art with Gelsih makes alllllll the difference. The plam tree I painted was super quick and suuuuuper easy.

This is another manicure I'm sorta in love with. Petal For Your Thoughts looks like it was MADE to go with Sunrise And The City. LOVE!! AND I got to use my new 3.5mm seashell studs! One more seashell before fall can't hurt ;) Although now I think I need to start looking for fall leaf studs >;) I'd seen quite a few manicures using little gold BBs as "coconuts" on their plam trees. I LOVE THAT! But I couldn't find any small gold BBs anywhere around me.
For the above manicure I did the following:

Index and Pinky Nails:
  1. 3 coats of Petal For Your Thoughts, cured all coats
  2. Finished with 1 coat of TIO, cured
Middle Nail:
  1. 3 coats of Sunrise And The City, cured all coats
  2. Finished with 1 coat of TIO, cured
Ring Nail:
  1. 2 coats of Petal For Your Thoughts, cured all coats
  2. 1 coat TIO, cure
  3. Layed down striping tape and painted 2 coats of Sunrise And The City along the top and bottom of the nail, leaving a strip of Petal across the center. Cured all coats
  4. Dabbed Foundation across the center of the nail and pressed the studs in, cured
  5. Finished with 2 coats of TIO, cured
Thumb Nail:
  1. 2 coats of Starburst, cured all coats
  2. 2 coats of Petal For Your Thoughts, sponging off the first gradient fade, cured all coats
  3. 2 coats of Orange Cream Dream, sponging off the second gradient fade, cured all coats
  4. 1 coat TIO, cure
  5. Used a small nail art brush to paint a palm tree with Black Shadow, cured
  6. Dabbed Foundation onto cured polish and pressed the stud in, cured
  7. Finished with 2 coats of TIO, cured all coats

Sunday, August 11, 2013

It's official: I FINALLY GOT MY SEASHELL STUDS!!!
Metal Seashell Nail Studs
Aren't they purdy!? A couple weeks ago I was poking around Instagram, looking for nail art, when I saw an announcement by a new account called shopthenailroom that they would be opening their Japanese nail stud store within the week and that it would contain seashell nail studs.
Some of you may be familiar with my epic search of doom for seashell nail studs. I was so, so stoked to find a seller on this side of the pacific that would be selling these studs. I immediately came to my blog and updated my previous post with the info cuz, let's face it - the vast majority of hits I get on this thing are from people looking for those shells!

By some strange circumstance, the store owner, oshimanails found my blog and hit me up, offering me a 15% blogger discount that I'm happy to pass on to you! I'm not getting any kind of commission, this is just a "help the nailists of the world" kind of thing ;)

shopthenailroom.com - Get 15% off order over $20 with code GELISHGEEKERY.

Right now she has gold and silver 5mm and 3.5mm seashell studs :D I'm just so glad my quest is finally done.
And now: on to the manicure!
I'm kinda sorta in LOVE with this Gelish mani. It's my favorite one since the nude & gold pearl mani. So, initially I was like, "OMG I WANT BEACHY NAILS BUT I CAN'T DECIDE WHAT I LIKE BEST SO HOW ABOUT ALL OF THEM!!" Like srsly I was going to do one of each of these on my nails:


By daily_charme

By MyMakeupMania

By CaptivatingClaws
PLUS the gold glitter nail that I ended up keeping. The night before I did my manicure I decided to do my first Gelish pedicure (linked to pedi pic because sometimes feet are weird to look at) and I ended up loving the Japanese nail art-inspired style so much I decided to recreate it on my nails. Thankfully, I decided to simplify things - but I still had to keep that cute beachy gradient by daily_charme. I used my new Gelish Garden Teal Party and lemme tell you - that formula is THICK! I tend to put my Gelish on thicker than I should (but somehow not thick enough to cause wrinkling) but this one gave me a run for my money. If the whole Love In Bloom collection is like this I bet it'd make great Gelish nail art polish. I also got to use my new 5mm seashell stud from shopthenailroom. Yup, it's just as awesome as I thought it'd be.

For the above manicure I did the following:

Index, Middle, and Pink Nails:
  1. 3 coats of Garden Teal Party, cured all coats
  2. Dabbed Foundation onto the polish and pressed the studs in, cured
  3. Finished with 2 coats of TIO, cured all coats
Thumb Nail:
  1. 2 coats of Up In The Blue, cured all coats
  2. 2 coats of Garden Teal Party, sponging off the first gradient fade, cured all coats
  3. 2 coats of Seafoam, sponging off the second gradient fade, cured all coats
  4. 2 coats of Skinny Vanilla Latte at the tip, sponging off the third gradient fade, cured all coats
  5. Scrubbed mix of gold and brown glitter into the tip of the nail
  6. 1 coat TIO, cure
  7. Dabbed Foundation onto the TIO and pressed the stud in, cured
  8. Finished with 2 coats of TIO, cured all coats
Ring Nail:
  1. 3 coats of Skinny Vanilla Latte, cured all coats
  2. Scrubbed mix of gold and brown glitter into the whole nail
  3. 1 coat TIO, cure
  4. Dabbed Foundation onto the TIO and pressed the studs in, cured
  5. Finished with 2 coats of TIO, cured all coats

Sunday, July 21, 2013

Gelish Watermarble and Watercolor This week I decided to try something I've been DYING to try: a watermarble with Gelish polish. Now, I've seen people extolling the joy of Gelish due to it's ability to easily dry marble, and while the dry gel marbles are really cute in their own right, they just aren't the same as a watermarbles. I just love those loops and swirls of color that swoop nonsensically across the nail.

MuckingFusser Watermarble
By MuckingFusser, the watermarble Queen

I'd seen a couple YouTube videos showing one could watermarble with Gelish and, this week, I wanted to give it a try myself. I decided to combine my love of watermarbles with my love of Japanese style nail art and I'm officially proclaiming it a success! I had at least 4 fails that I had to take off and redo, but after some trial and error I finally figured it out!

Gelish Watermarble and Watercolor

For the above manicure I did the following:

Ring & Middle Watermable Nails:
  1. • Started off with 2 coats of Sheek White and 1 coat of TIO
  2. • Poured bottled water into a shot glass and wrapped medical tape around my nails to help with the clean-up
  3. • Mixed up Coco Cabana Banana with a bit of Don't Be Such A Sourpuss to get a toned down, less neon yellow
  4. • Alternately dripped the yellow mix, My Favorite Accessory, A Petal For Your Thoughts, and Seafoam into the water. The mixed yellow didn't "spread" in the water as well as the other ones, so less yellow ended up being visible in the final marble. I pulled the polish across the water to get the design I wanted
  5. • I stuck my nail on the part of the design I wanted and kept my finger in the water
  6. • I picked up the UV light and held it over the water for 10-15 seconds, just enough to slightly cure the left over gelish that wasn't on my nail
  7. • I then took a toothpick and gathered up the remaining polish - just like they do in all the tutorial videos. I found this step was actually really, really important: if you just pull your finger back out of the water with the Gelish polish still floating on the surface, that polish will layer back over the nail as you pull your finger out. This'll essentially create two layers of polish on the nail and it'll bubble and wrinkle horribly once you cure it
  8. • I removed the tape from my finger and cleaned up around the nail with an art brush and non-acetone remover
  9. • Cure the nails, TIO, cure again, and you're done!
For the other three nails I was going for that gorgeous watercolor effect I see on so much Japanese nail art. While I like how the watermable and watercolor art turned out, I don't think I'll combine them again. The watercolor is so deleicte and the watermarble so bold that they don't mesh well enough for my tastes.

Hana4 Japanese Nail Art
By hana4, I love her nail art SOMUCH.

Thumb, Index, & Pinky Watercolor Effect Nails:
  1. • Started off with 1 coat of Simple Sheer, TIO
  2. • Then followed with 2 coats of Sheek White, allowed for the half moon peek-a-boo, and TIO
  3. • Dripped spots of my yellow mix, My Favorite Accessory, A Petal For Your Thoughts, and Seafoam onto the nail and, using a small nail art brush, swirled and blotted the colors around until they were blended and mottled-looking. Cured.
  4. • Used craft glitter and small nail art brush to create a glitter line along the peek-a-boo half moons
  5. Used the same small art bush to apply TIO JUST on the glitter. I found that applying TIO like you normally would across the whole nail when the glitter is still loose on the nail will spread some glitter across the nail, and I didn't want that
  6. • Cure, then apply TIO across the whole nail. Cure, apply studs, more TIO over the studs, and done!

Friday, July 19, 2013

I've been having fits all week, ranging from anger, to sadness, to deep longing over the fact that we weren't able to get tickets to San Diego Comic-Con this year. I was tormenting myself yesterday by searching #sdcc on Twitter and Instagram. I found a live blog of the Dreamworks panel and, man, they showed extended clips of How To Train Your Dragon 2!! I'm probably looking forward to this movie more than Star Wars, Star Trek, Wolverine, Catching Fire, and pretty much every other nerdy movie combined. Ugh. My love for HTTYD runs deep.


So, I think in an unconscious effort to fill the Comic-Con void, I went nail art/polish CRAZY this week!

First off, I'm officially 100% obsessed with Japanese Nail art (check out Hana4 on Instagram to see what I'm talking about!). So I raided eBay for nail studs and art that might help me replicate some of the awesome Japanese nail art I've been seeing.

Here's what I splurged on (click on the images to check out the item on eBay!):

I'm SO. EXCITED.

Then, I sat at work and drew out sketches on Post-It notes of the nail art I plan on doing on my GF and I this weekend. Does anyone else do this or otherwise plan out their next mani?


GF's next mani. I think these sketches only make sense to me…

Then last night I decided I needed to go to Sally's and pick up a 180 grit file. Of course I checked out the clearance Gelish, but there weren't any new colors. Then as I walked past the normal Gelish display, I noticed a number of colors were on sale for $10.95! So a $2 shopping trip turned into a $30 shopping trip, and I picked up…

Up In The Blue

Medieval Madness

Night Shimmer

Up In The Blue has been on my want list for a while! So I'm pretty stoked :D

And now, I need to sink into poverty for the rest of the month >.>

Sunday, July 7, 2013

9/20/13 Update: Now that summer's over it seems like the demand for these seashell studs has died down, but that means they can actually be FOUND! Here's a small list of places I know currently have the shells in stock:
I've actually purchased from all three of these sellers and have had no problems. :)

8/22/13 Update: jewelrynailartsupply.com has started selling Pieadra seashell studs! She's got the 4mm and 5mm sizes, but is sold out of the gold 4mm as of this writing. Keep checking back at her site!

7/25/13 Update: shopthenailroom.com has gotten in contact with me and is offering a special discount to anyone visiting through my blog! Use discount code GELISHGEEKERY to get 15% off orders over $20 (expires September 14th)! I just ordered my shells and am planning on featuring them in my next manicure. So excited!

7/22/13 Update: shopthenailroom.com just opened and began selling their own gold seashell nail studs. On their instagram, @shopthenailroom, they're offering a 15% off discount code, GRANDOPENING, that expires July 26th. I'm definitely gonna grab some up!


About a month ago I was browsing nail art on Instagram when I suddenly came across a manicure and immediately said, "HOLY SHIT BALLS I NEED THAT."


From ThePolishedFox.com

I just fell crazy, crazy in love with it. Especially with the seashell. How classy! How beachy! I had to have it, I just needed to pick up some seashell studs and I'd be fine, right?

Little did I know that I was about to embark on an obsessive, epic search that would suck up days of my life. That classy little seashell was, literally, NO WHERE TO BE FOUND. I googled my face off and could not find it ANYWHERE. I Yahoo Answer'd it, Redditted it, got the GF on board, woke up in the middle of the night thinking, "oh, I didn't use this search term..." Nothing. I stared lurking through comments left on any nail art that featured that gorgeous golden shell - I saw a lot of other people asking, "where'd you get that!?" and no answers.

Finally, my GF discovered miniature scallop shells on eBay. The sizes checked out and I figured I could paint a couple of them with gold nail polish and apply them to my nails, so I grabbed up a bag of mini shells. Immediate problem solved, but epic Mystery of the Golden Seashell Nail Stud still ongoing.

Through my searches I noticed a trend - most of the nail art featuring these gold seashell nail studs were coming out of Japan. I pulled up google translate, popped in "gold seashell nail stud", translated it to Japanese, and googled it.

OH MY GOD.

There they were, hiding on the Japanese sites. The seashell nail studs are made (predominantly, it seems) by a Japanese brand, Pieadra. Unfortunately, it doesn't seem like these Japanese sites ship internationally. Poop. I emailed jewelrynailartsupply.com when I saw they sold th Pieadra brand, but she said as far as she could see the seashells were sold out.

I live near quite a few asian-oreinted beauty and nail supply places, checked those out, but no luck there.Then, about a week later, after I'd given up on my search and applied my copycat mani... I FOUND THEM! Now, I've never used this site and I can't vouch for it, but it seems as though, theoretically, possibly, they'll ship to the US. So, for anyone that was like me, looking for these damn seashell metal nail art studs... you're welcome. A good 25+ hours of my life to find this.

However IF you know of any place in southern California or any other shop online that sells them, PLEASE comment here!

And now, on to my version of the mani!
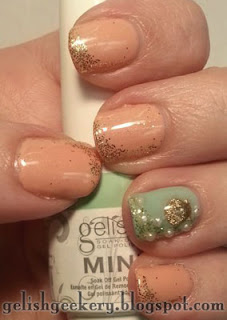
Gelish Seashell Nail Stud Art

For the manicure above I did the following:
  1. Mixed about 4-5 drops of Take Action with one drop of Orange Cream Dream and one drop of Sheek White in an attempt to get a nice coral color. I put three coats of "coral" on.
  2. 3 coats of Seafoam on the ring finger
  3. Dipped a nail art brush into gold glitter and "scrubbed" the glitter into the cured polish
  4. 1 coat TIO on all
  5. Ring finger details:
    • A couple days before I took the smallest of my mini seashells and painted them with 2 coats of Sally Hansen Hard as Nails Xtreme Wear in Golden. I put a drip of foundation in the underside of the shell and cured it
    • Dotted Foundation where I wanted the studs, set studs, and cured
    • Finished with 2 coats of TIO
I'd like to note that I'm writing this up about 5 days after I applied the manicure and I'm noticing some definite fading on the coral color I mixed. The pink pigment is all but gone and the nail color really just looks like a pale orange. It still looks nice, but it's ineresting to note that the Candyland and Breast Cancer Awareness lines might not mix too well.

Sunday, June 23, 2013

Last week I ordered some nail art pearls off Amazon. When I first saw people use them I poo-poo'd them as just being TOO much, but DAMN some of those manicures look so ELEGANT! I used the new nude Gelish color we just got and went to town!

Gelish Skinny Vanilla Latte
Gelish Skinny Vanilla Latte Gelish Simple Sheer
For this Gelish mani I used:
  • A base coat of Sheek White on all but the pinky nails
  • 3 coats of Skinny Vanilla Latte on all but the pinky nails
  • 2 coats of Simple Sheer on the pinky + Skinny Vanilla Latte and Sheek White for the little flowers
  • Nail pearls
  • Gold striping tape
  • Gold square nail stud
  • Some gold craft glitter I found on sale at Michaels
This manicure marked a couple of firsts for me:
  1. First time scrubbing in glitter
  2. First time using the pearls
  3. First time using Gelish polish to create nail art (more than polka dots or stripes, anyway)

1. Scrubbing Glitter In

So this was way easier than I had made it out to be. I took one of my nail art brushes, stuck it in the bag full of glitter, and brushed it right on to the nail. It was crazy simple and fast. I actually had way too much glitter on the brush than I needed - a little really does go a long way.

2. Using Nail Pearls

I'd recently read an awesome guest post on Chickette's blog that suggested using the foundation to apply nail studs and 3D art. I tried it out by putting a small dab of foundation on the cured/top-coated nail then placing the pearl on top. The pearl slid around a bit, but once I popped it under the UV light for 2 minutes it stayed put. I'm anxious to see how long it lasts!

3. Gelish Nail Art

Now, my previous attempts at using Gelish polish to actually paint designs on the nail have failed. Horribly. But from what I saw on the internet it was totally do-able. I decided to give it another go today and try painting some really small flowers on the sheer pinky nail. I'd put down my 2 coats of Simple Sheek then began trying to shape the flowers with the Sheek White. The color just bled into an amorphous shape, as I'd previously experienced. I decided to cure a Top-It-Off coat on top of the nail, wiped it clean, then tried applying the Sheek White flowers.

Omg, you guys.


THAT'S WHAT WAS MISSING THIS WHOLE. FRIGGIN. TIME. The polish didn't bleed any more! With Gelish I'm learning a very important rule: When in doubt, Top-It-Off.

One Small Catch

Literally. On my last coat of Top-It-Off on my pinky nail I went too thick and didn't clean it up well. Ever wanted to see what NOT to do with Gelish? Here you go:

Gelish Skinny Vanilla Latte

This is Gelish's Bane (Isildur ain't got nothin' on this). It's lifted where it cured against the skin, creating a delightfull little rivet in which water will travel into and, eventually, cause the whole thing to lift.

I'm giving that pinky nail until Friday, tops.

Other than that, I'm kinda in love with this manicure.