Showing posts with label Studs & 3D Nail Art. Show all posts

Sunday, May 4, 2014


My roommate is a big fan of the A Song of Ice and Fire book series, and for the newest season of Game of Thrones she request nails inspired by her favorite house, House Martell. Now that I've seen a few episodes of the new season, I can see why she likes them!

#Badass.

I knew nothing about the Martells and she told me "sand and sunspear", so I went with that.
Gelish Game of Thrones Martell Nails
I finally tried something I've been wanting to try: gel polish sugar nails. I drool every time I see Zoya Pixie Dust pop up on my Instagram feed, and I've really wanted to try to replicate that effect with Gelish. First I tried decorative sand from the craft store, but the grains were way too big, then I tried salt - better, but still large. I stuck with the salt, but I might try actual sugar next time ;)

To do it I mixed a tiny bit of salt with a few drops of polish, then scooped it up with a wide nail art brush and patted it onto the nail. After curing it I got a slightly darker polish color and stippled it across the nail to give it some dimension. Another cure, then I stippled a tiny bit of brown glitter across the nail and finished with a light coat of Top It Off. The technique definitely needs some refining, but at least it kinda worked!

For the above manicure I did the following:

Thumb Nail:
  1. • 1 coat Allure, 1 coat Danny's Little Helpers, and 1 more coat Allure, cure all coats
  2. • Wipe tacky layer. Hand-painted the red sun with Hot Rod Red, cure
  3. • Wipe tacky layer. Hand-painted the spear with yellow and black Folk Art acrylic paint. Let paint dry completely.
  4. • Finished with 2 coats of TIO, cure all coats

Index Nail:
  1. • 3 coats Lust at First Sight, cure all coats
  2. • Dabbed Gelish Structure onto the polish and pressed the studs in, cure
  3. • Finished with 2 coats of TIO, cure all coats

Middle Nail:
  1. • 1 coat Lust at First Sight, cure
  2. • 1 coat All That Glitters Is Gold, cure
  3. • 1 coat Lust at First Sight, cure
  4. • 1 coat of TIO, cure
  5. • Wipe tacky layer. Stamp image using Konad White and MoYou Pro 06 plate. Let dry completely.
  6. • Finished with 1 coat of TIO, cure

Ring Nail:
  1. • Mix Lust At First Sight with salt and pat onto nail, cure
  2. • Stipple A Little Cream Please with nail art brush, cure
  3. • Press a small amount of brown glitter into tacky layer
  4. • Finished with 1 thin coat of TIO, cure

Pinky Nail:
  1. • 2 coats Lust At First sight, cure all coats
  2. • Press gold foil into the tacky layer until desired look is achieved
  3. • Finished with 1 coat of TIO, cure

Monday, April 21, 2014


It's spring! And I've been craving some gorgeous spring colors on my nails, but I haven't really been inspired to wear "spring" nails - like flowers and bunnies and all that jazz. I knew I wanted to use Seafoam and Sweet Morning Dew, then I decided I wanted to use my seashell studs, and from there mermaid nails were born.
Gelish Spring Mermaid Nails
I'm in love with these nails. IN LOVE. I don't even have them on anymore and I'm still in love with them. If my nails hadn't been freakishly long (for my tastes) I would've kept them on for a third week. I loved the colors and the studs (gurl, I went STUD CRAZY) and OMG THE FOIL NAIL. Right now I'm like:
No joke. I also used the Gelish VitaGel Nourishing as the base coat for this mani. I've been hesitant to pick up a VitaGel because I read horrible reviews when they first came out. But my nails are just... guys, they're tore up. Not even gonna lie. It's because I use too many coats of Top It Off combined with Structure and studs and... it makes removal really, really hard on my nails.

But I'm happy to report I'm writing this up a day after removal with the VitaGel basecoat and... removal was fantastic!! I thought it'd be a particularly hard removal sesh, as the studs + the Structure make it difficult for the acetone to break down the polish, but the Vitagel came off super smooth and in solid pieces. I used it exactly as I would've used regular Foundation, dry brush and all, and I had absolutely no problems with wear. No peeling or lifting, removal was great, and my nails looked substantially less tore up once I got the polish off. I think I might switch exclusively over to VitaGel for my manis here on out!

Oh, and I'm stoopid for not taking before/after pics for the VitaGel. Lots of fail right there.

For the above manicure I did the following:

Thumb Nail:
  1. • 2 coats Sweet Morning Dew, cure all coats
  2. • Dabbed Gelish Structure onto the polish and pressed the studs in, cure
  3. • Finished with 2 coats of TIO, cure all coats

Index Nail:
  1. • 3 coats Seafoam, cure all coats
  2. • 1 coat Candy Shop, cure
  3. • Dabbed Gelish Structure onto the polish and pressed the studs in, cure
  4. • Finished with 2 coats of TIO, cure all coats

Middle Nail:
  1. • 1 coat Oocha Coocha, cure
  2. • 1 coat Are You Feeling It?, cure
  3. • 1 coat Oocha Coocha, cure
  4. • 1 coat of TIO, cure
  5. • Wipe tacky layer. Stamp image using Konad White and MoYou Suki 01 plate. Let dry completely.
  6. • Finished with 1 coat of TIO, cure

Ring Nail:
  1. • 2 coats Sweet Morning Dew, cure all coats
  2. • Dabbed Gelish Structure onto the polish and pressed the studs in, cure
  3. • Finished with 2 coats of TIO, cure all coats

Pinky Nail:
  1. • 3 coats Seafoam, cure all coats
  2. • Press gold foil into the tacky layer until desired look is achieved
  3. • Finished with 1 coat of TIO, cure

Wednesday, April 16, 2014


A simple one today! My coworker came in to get her nails done and told me, "I want spring-y nails!" However, with her style and attitude I could NOT shake myself of my tendancy to use black on her. So I went with a slightly punk-ish variation on a spring nail.
Gelish MoYou Punk Spring Nails
I used Black Shadow, Go Girl, and Garden Teal Party. I had been really wanting to try using MoYou stamping as a kind of... negative-space accent, which I tried out on her thumb with Pro plate 06 (also used this plate on her pinky). I really like that look!

I hand-painted the flower on her ring finger and loaded studs on to her middle finger.

Wednesday, March 5, 2014


A couple weeks ago I had a 15% off coupon for Sallys that doubled to 30% off on the 22nd only, so you can bet I was at a Sallys store bright and early on Saturday, the 22nd. I did as I always do and went straight to the red tagged Gelish bin and, much to my HUGE surprise, The Snow Escape collection was sitting there, discounted down to $5.95 a bottle!!
Gelish Snow Escape Collection
I only had one color from Snow Escape, so I bought what they had, then went to another Sallys to find the last color I needed, I Heart My Instructor. I LUCKED OUT and the second Sallys I went to had one left. I completed my Snow Escape collection for under $23!!

We went home and decided that we definitely had to use two of the colors from that collection on my financée's next mani.
Gelish Snow Escape Boarding School Nails
I'm in love with this mani. She's had it on for a week and a half and I still keep grabbing her hands to look at it. It kinda reminds us of a British school uniform.

I used I Heart My Instructor, Let's Hit The Bunny Slopes, and 'Lily' by ENP Gella. I hand-painted the dandelion-type flower with some yellow Folk Art acrylic paint and covered that nail with two coats of Gelish Matte Top It Off. On the index finger I used my new Nail Vinyls. I stuck the vinyls on, flash cured 1 coat of I Heart My Instructor, then took the vinyls off. I did it this way to try to avoid having fully cured polish peel up when removing the vinyls, like I've experienced with nail tape. It worked well! I used a small brush to paint on an extra coat of Instructor - super easy since the "guidelines" were essentially already there. :) That nail got Matte TIO , too. Everything else was hand painted - still practicing hand-painting straight lines!

Wednesday, February 19, 2014


This one is actually a straggler from Valentine's Day - I completely forgot to post it! My coworker wanted a Valentine's Day mani and showed me a picture with some polka dots and some hearts, so I took that and ran!
Gelish Valentine's Nails
For the colors, I used Queen of Hearts for the red. I love, love, love that color!! The gold glitter accents are made of one layer of loose gold glitter, a layer of Water Field, and a layer of All That Glitters Is Gold. And I used Arctic Freeze for the white middle nail.

I also focused on doing some hand-painting this time around! I hand-painted the lips with Queen of Hearts - it's a nice, thick polish that handles well. I only used one coat of it on the lips and I think it turned out perfectly, despite not being AS dark as 2 coats would've been. On the thumb I laid down 2 coats of Queen of Hearts and painted on the heart with 2 coats of Arctic Freeze. I then used Black Shadow to paint the Zebra stripes.

About my Black Shadow... I have a full-sized bottle of Black Shadow and, no matter how often I clean it up, polish leaks out from under the cap and pools around the base of the bottle neck. I've actually found that the little pool of polish thickens over time as it's exposed to air... and becomes really nice to work with for painting! It's very stringy and viscous, but once on the nail it's absolutely opaque in 1 coat!

To finish up, I found a set of 3 MASH nail art stud wheels on Amazon - which included some cute little heart rhinestones - and I popped those on her nails. I've since found those studs don't want to stay on for some reason, so if you use little heart studs like this, make sure to double top coat.

Wednesday, February 12, 2014

Gelish Valentine's Day Geek Nails
Last weekend we hit up the 50% off clearance sale going on at Sallys and I found they were clearancing their Christmas Cina nail stud wheels. I picked up quite a few (I'm ready for next year!) and they included these super cute bowtie studs. When my fiancée saw them she knew she HAD to use them in her manicure.
Gelish Valentine's Day Geek Nails
I'm happy to say she designed virtually all these nails! I came home form work and she had drawn up a whole bunch of Valentine's Day nail designs on paper and I thought they were brilliant!!! I picked 5 and went to town. The poindexter nail was the one she really wanted, and the new bowtie studs were perfect! I also used this opportunity to practice making stripes by hand. I REALLY need to practice that. I don't want to rely on nail tape for stripes. I didn't do too bad on the ring finger!

I used Go Girl for the pink, Arctic Freeze for the white, and Queen of Hearts for the red. I think Queen of Hearts is my new favorite red. Perfect coverage in 2 coats and it's just a beautiful, rich frost polish. LOVE it. On the thumb we stamped from the MoYou Pro 07 plate using Konad white polish. The only one I'm unhappy with is the heart on the index finger. I did the white outline as an afterthought and it looks a bit messy. If I had thought about it I would've made the white heart first, then filled it in with the pink heart to get cleaner lines.

Sunday, February 9, 2014


My coworker told me a while ago that I would be doing her nails for her up-coming honeymoon on the island of Cozumel, near Cancún, Mexico, and she showed me the collection of bikinis she planned to take with her. I was immediately inspired and came up with a set that would match the colors in a couple of her bikinis.

Gelish Tropical Neon Nails
The palm tree and dolphin studs were actually free gifts that came with one of my orders from AthenaRose! They were the perfect studs for this mani! I put the dolphin stud on her pinky and painted a palm tree on her thumb, then on her other hand I did the palm tree on her pinky and the dolphin on her thumb for a little bit of mix-and-match.
Gelish Tropical Neon Nails
I bought Ocean Wave specifically for this mani because I wanted a bright, bright blue. Based off Chickette's swatches Ocean Wave definitely looked like the best candidate. In reality, the polish was rather sheer and needed a lot of coats to get that bright blue color - I got away with 3 coats on the ring finger only because I knew I'd be loading it up with studs. I wish I would've gone with a blue creme for better coverage.

I hand painted the dolphin, palm tree, and flowers using Gelish polish and didn't have any problems - well, except one: the yellow accents on the middle fingers. On the right hand (top image) I used Coco Cabana Banana to paint the yellow accents. The formula was quite watery and spread all over, and over the black the yellow actually looked green. To try and fix this I put a layer of Don't Be Such A Sourpuss over the cured Coco Cabana, but as you can see the damage was already done. On her left hand (bottom image) I STARTED with Sourpuss and then added a layer of Coco Cabana and the results were MUCH cleaner.

Another gripe I had was with the striping effect on the index nail. I created the gradient first then laid down the striping tape and painted the black over. I've consistently noticed the gel polish had a tendency to "leak" under the tape, causing the striping to look messy once you lift the tape. I think I just need to bite the bullet and start practicing hand-painting stripes.

For the above manicure I did the following:

Thumb Nail:
  1. • 2 coats Coco Cabana Banana, cure all coats
  2. • 2 coats Brights Have More Fun, use a small piece of sponge on the uncured polish to create a gradient effect, cure all coats
  3. • 3 coats Ocean Wave, use a small piece of sponge on the uncured polish to create a gradient effect, cure all coats
  4. • Wipe tacky layer. Using a nail art brush, paint dolphin/palm tree using 2 coats of Black Shadow. Cure all coats.
  5. • Dabbed Gelish Structure onto the polish and pressed the studs in, cure
  6. • Finished with 2 coats of TIO, cure all coats

Index Nail:
  1. • 2 coats Coco Cabana Banana, cure all coats
  2. • 2 coats Brights Have More Fun, use a small piece of sponge on the uncured polish to create a gradient effect, cure all coats
  3. • 3 coats Ocean Wave, use a small piece of sponge on the uncured polish to create a gradient effect, cure all coats
  4. • Wipe tacky layer. Lay down striping tape in striped pattern
  5. • 2 coats Black Shadow, cure
  6. • Using tweezers, slowy and carefully pull the striping tape off. It helps to keep the tweezers close to the nail as you pull, grabbing both the tape AND the polish that's covering the tape as you pull the tape off.
  7. • Finished with 1 coat of TIO, cure

Middle Nail:
  1. • 2 coats Black Shadow, cure all coats
  2. • Wipe tacky layer. Using a nail art brush, paint flowers using 2 coats of Brights Have More Fun, 1 coat of Don't Be Such A Sourpuss, and 1 coat of Coco Cabana Banana on top of Sourpuss. Cure all coats.
  3. • Finished with 1 coat of TIO, cure

Ring Nail:
  1. • 3 coats Ocean Wave, cure all coats
  2. • Dabbed Gelish Structure onto the polish and pressed the studs in, cure
  3. • Finished with 2 coats of TIO, cure all coats

Pinky Nail:
  1. • 2 coats Black Shadow, cure all coats
  2. • Dabbed Gelish Structure onto the polish and pressed the stud in, cure
  3. • Finished with 2 coats of TIO, cure

Friday, January 31, 2014

Gelish Chinese New Year Nails
The first month of this year has started off a bit rough. I have friends and family facing health and financial problems, so I felt like I was in need of some good luck to kick off the year. I decided to go with some reds and golds and stamping for Chinese New Year (is that PC? Is Lunar New Year better?).
Gelish Chinese New Year Nails
I gave the gold Konad stamping polish another shot, and I was again disappointed. It's just not very visible, which is a shame because the images from MoYou Suki 01 and 07 plates are gooorgeous. The middle finger stamp is a Japanese fan and on the thumb is the face of a Chinese dragon. I should also mention I had a HELL of a time getting the fan image to transfer with the Konad gold polish. I got my left hand stamped in a couple of tries, but even after 20 minutes I could NOT get the fan image to transfer onto my Konad stamper again so I could stamp the right hand. I even tried using a different polish to see if it was the stamper or the plate... the other polish was fine, it was just that Konad gold that wouldn't transfer. I ended up stamping a bamboo image on my right hand just to be done with it.

On the ring finger I used Kim from Ten Little Canvasses' tutorial on making gems with Gelish structure. I put a little gold glitter in the circle frame, but I wish I had used gold polish instead. I think it would've had a nicer effect. The index finger is a layer of Allure, All That Glitters Is Gold, some loose gold glitter, then another layer of All That Glitters.

I used 2 coats of Hot Rod Red for the red nails - really feels like the PEFECT red for Chinese New Year. I know Gelish came out with a Year of the Snake set last year and a Year of the Horse set this year, and while I still really want Meet The King, I think I'll skip on the other colors (at least until the collector's bug bites me). ;)

On the pinky and ring finger I used 2 coats of Allure over one coat of Arctic Freeze. I had thought that, since Allure was a bit sheer, I should lay down a layer of white. I did this on my left hand but on my right hand I did 3 coats of Allure with no white base coat. I really feel like the 3 coats of Allure looks much better than 2 coats over white. I also used Hot Rod Red to paint (what the internet tells me is) the year of the horse symbol.

Wednesday, January 29, 2014

Gelish Sailormoon Nails
So, I'm a pretty big Sailormoon fan.
In middle school (which was around the time of the original broadcast, so I think I can be a hipster about liking it before it was cool ;) I remember secretly asking my mom if she could tape Sailormoon for me. Then I remember talking my mom into changing our cable subscription when I found out new episodes of Sailormoon would be airing on some then-unknown channel called Cartoon Network. Once I started driving I was at the comic book store and collected the english monthly comics that they started releasing (anyone remember MixxZine??).

Now that the rights have been renewed it's Sailormoon fever! Merchandise is everywhere, which is fine, but I'm MOST excited about the upcoming Sailormoon TV series reboot (now pushed back to summer)!!! I recently read that the reason there were so many "filler" episodes in the original series was because they were producing it AS Naoko Takeuchi was writing the manga, so they actually didn't know what the story was going to be! I'm hopeful for an improved, slightly more adult storyline with knock-out gorgeous animation. Also, Haruka and Michiru (so help me if English dubbers translate them as "cousins" again... someone gonna get hurt).

So I was really excited when my roommate requested Sailormoon nails!
Gelish Sailormoon Nails
I went with Sailromoon-inspired rather than literal. I needed 3 coats of Arctic Freeze for opacity and free-handed the thumb, index, and middle fingers with gold and silver acrylic paint. The pinky is just a bit of craft store glitter. On her ring finger I used Konad gold stamping polish and MoYou Pro Collection 07 plate. I've decided I don't like the Konad gold and need a new gold polish that's a bit more opaque and vibrant. Any good suggestions?

Sunday, January 19, 2014


After our extended vacation and months of using the holidays as an excuse to eat EVERYTHING IN SIGHT, it's time to get back on track with eating right, counting my calories, and exercise. I stepped on the scale at the beginning of the week and, after spending a few moments cursing Past Me for shoving 4 metric tons of pizza, cookies, and stuffing in my face (Past Me, why do you punish Current Me and Future Me so much!?), I locked in my determination. We scheduled our engagement pics for March 9th, so that gives me enough time to lose 8lbs. Oh, it's on.
Srsly, though. Right now my life is like, "My jeans don't fit, but DAMN my nails look good!"

Speaking of my nails!! I'm in love with them. Namely, I'm in love with 2 things about them: my MoYou stamp (from Suki Collection 01) and my squaletto/monroe/coffin shape.
Gelish Mauvy-Mauve and Grey MoYou Stamp Nails
These MoYou plates are giving me so many ideas! There are so many options!! And this squaletto nail shape? I've spent months trying to find The Shape for me, and I think this is it. There are 2 downsides to the shape, one being they take a little longer to get back in to shape when it's time to change polishes (although seeing as my last Gelish manicure lasted 20 days, it might not always take quite as long to file them down as it did this time around).

The other downside is they're decidedly weaker. Over the 20 days my last manicure lasted there were a NUMBER of times I felt a nail bend all the way forward, like at a 90° angle. But it's a testament to Gelish that even though my nails bent, the polish didn't pop off and the nail didn't break. For this week's mani I included the AcryGel method I previously mentioned and added a layer of Structure on top of that. They already feel stronger :D

For the above manicure I did the following:

Thumb Nail:
  1. • 2 coats Mauvy-Mauve, cure all coats
  2. • Add dots of Structure and place studs, cure
  3. • Finished with 2 coats of TIO, cure all coats

Index Nail:
  1. • 2 coats Fashion Week Chic, cure all coats
  2. • 2 coats Concrete Couture, cure all coats
  3. • Finished with 1 coat of TIO, cure

Middle Nail:
  1. • 2 coats Mauvy-Mauve, cure all coats
  2. • Wipe tacky layer. Hand paint design with 2 coats of Fashion Week Chic, cure all coats
  3. • Finished with 1 coat of TIO, cure

Ring Nail:
  1. • 2 coats Fashion Week Chic, cure all coats
  2. • 1 coat TIO, cure
  3. • Wipe tacky layer. Stamp image using Konad Silver polish
  4. • Let dry. Finished with 1 coat of TIO, cure

Pinky Nail:
  1. • 2 coats Mauvy-Mauve, cure all coats
  2. • Wipe tacky layer. Daub on 2 coats of Sweet 16 in a half-moon shape, cure all coats
  3. • Finished with 1 coat of TIO, cure

Sunday, January 12, 2014


For Christmas this year, I was SUPER stoked to find my soon-to-be sister-in-law got me MoYou London stamping plates!! As a result I spent a decent amount of time drawing out mani ideas, using the plates as inspiration. A couple of the images on the Pro Collection 07 plate really caught my eye and made me think of my finacée and her love of Paris.
Gelish Nude And Black Paris MoYou Nails
Her poor cuticles took a beating in the cold, dry air while we were on vacation. I really want to buy some CND Solar Oil and have her try daily applications to see if that'll help them out. I definitely need more practice with stamping, and I think I need a larger stamper, but I feel like this was a good start. I want to try to incorporate a stamp or two in my manis over the next couple of months. There are just so many possibilities! I found I like curing a coat of Top IT Off over the polish before attempting stamping. I messed up the first few stamps, and with some non-acetone polish remover it was a breeze to take off the stamp and try again. I used my new striping tape technique for the tape I laid down on the pinky. So far, so good! Also, I got to use one of my new colors, Need A Tan - needed 3 coats for opacity, but I'm really happy with that color!

For the above manicure I did the following:

Thumb Nail:
  1. • 3 coats Need A Tan, cure all coats
  2. • 1 coat TIO, cure
  3. • Wipe tacky layer. Stamp image using Konad Black polish
  4. • Let dry. Finished with 1 coat of TIO, cure

Index Nail:
  1. • 3 coats Need A Tan, cured all coats
  2. • Create the half-moon smile line with Black Shadow, apply 2 coats, cure all coats
  3. • Finished with 2 coats of Matte TIO, cure all coats

Middle Nail:
  1. • 3 coats Need A Tan, cured all coats
  2. • Wipe tacky layer. Hand paint cat design with 2 coats of Black Shadow, cure all coats
  3. • Add dots of Structure and place studs, cure
  4. • Finished with 2 coats of TIO, cure all coats

Ring Nail:
  1. • 3 coats Need A Tan, cure all coats
  2. • 1 coat TIO, cure
  3. • Wipe tacky layer. Stamp image using Konad Black polish
  4. • Let dry. Finished with 1 coat of Matte TIO, cure

Pinky Nail:
  1. • 3 coats Need A Tan, cure all coats
  2. • Wipe tacky layer. Lay down striping tape and press firmly into nail
  3. • Apply one coat of Structure across entire nail, cure
  4. • Finished with 1 coat of TIO, cure

Thursday, December 26, 2013

Gelish Christmas Nails
Merry Christmas!
I had planned on getting this up on Christmas Eve, but I was SO INSANELY BUSY I had no time. I'm currently writing this up 2,000 miles away from home, visiting the soon-to-be in-laws (Steak N Shake and Cracker Barrel, here I come!!). I've received so many incredible Gelish and nail art gifts this Christmas (MoYou, omg MOYOU) - I can't WAIT to get home and start swatching and reviewing! As it is this will probably be my last post until the first or second week of January. :( But don't worry, I've got tons of stuff to write about in January!
Gelish Christmas Nails
While I've absolutely LOVED all the faire isle nail art I've been seeing, I knew I didn't have the time (or talent, omg) to create something so intricate. I decided on a simple, fun mani for Christmas that'd give me the opportunity for just a tiny bit of nail art. ;)

I also changed the shape of my nails (AGAIN) to a blunt almond/squaletto. I've seen that shape pop up a couple of times on Instagram and I loved how classy it looks. The corners of my nails are just TOO brittle to maintain a square shape (the corners chip even with gel polish on), but I thought this might be a nice way to have a square-ish shape while eliminating those pesky corners. The shape actually looked really severe and weird without polish, but once I got polish on and started capping the free edges it really softened up all the angles. I'm hoping with more practice I can make this shape work.

For the above manicure I did the following:

Thumb Nail:
  1. • 1 coat Just What I Wanted, cure
  2. • Scrub loose green craft store glitter into the tacky layer
  3. • 1 coat Just What I Wanted, cure
  4. • Wipe tacky layer. Paint on Sheek White until snowman shape is achieved, cure
  5. • Add one more layer of Sheek White to achieve opacity, cure
  6. • Add eyes and mouth with Black Shadow and buttons with silver Folk Art acrylic paint, cure
  7. • Finished with 1 coat of TIO, cure

Index Nail:
  1. • 3 coats Sheek White, cure all coats
  2. • Wipe tacky layer. Lay down two parallel pieces of striping tape, paint 2 coats of Red-Y And Waiting in a round shape, cure all coats
  3. • 1 coat Life of the Party over the red polish, cure
  4. • Using tweezers, slowy and carefully pull the striping tape off. Add dots and zig-zag pattern with Sheek White. Add ornament hook with silver Folk Art acrylic paint, cure
  5. • Finished with 1 coat of TIO, cure

Middle Nail:
  1. • 3 coats Sheek White, cure all coats
  2. • Paint design with 2 coats of Red-Y And Waiting and 2 coats of Just What I Wanted, cure all coats
  3. • 1 coat Life of the Party over the red polish, cure
  4. • Finished with 1 coat of TIO, cure

Ring Nail:
  1. • 3 coats Sheek White, cure all coats
  2. • Wipe tacky layer. Lay down 3 pieces of striping tape in a zig-zag pattern
  3. • 1 coat Just What I Wanted in triangle shape, cure
  4. • Scrub loose green craft store glitter into the tacky layer of the green polish
  5. • 1 coat Just What I Wanted, cure
  6. • Using tweezers, slowy and carefully pull the striping tape off. Add dot of Structure to top of tree and place stud, cure
  7. • Finished with 1 coat of TIO, cure

Pinky Nail:
  1. • 2 coats Red-Y And Waiting, cure all coats
  2. • 2 coats Life of the Party, cure all coats
  3. • Finished with 1 coat of TIO, cure

Friday, December 20, 2013


Here we go with yet another set of holiday nails! (didn't I say this would be Christmas Nail Week? ;) My coworker agreed with me that white nails are incredible and Need To Happen. I think I was scraping the bottom of my bottle of Sheek White for this one, but I got it done!
Gelish Christmas Holiday Nails White Snowflake
Did I buy teardrop studs for the express purpose of making Christmas light nails? Yes. Yes I did. But, when combined with a small round stud, they also made the CUTEST little bow on her ring finger! I used 3 coats of Sheek White on all her nails. On her pinky I scrubbed in some loose silver holo glitter from Michael's and created a fade from the tip of the nail. I then added a thin coat of Am I Making You Gelish over the top (sorry it's out of focus in this pic!).

On her index I used silver Folk Art acrylic paint to paint a snowflake (and used it for the Xmas light "wire" on her thumb). Now, her ring finger is where we're running an experiment. I really wanted to use silver striping tape, but we ALL KNOW that even under 2 coats of Top It Off that shiz will lift up. I was lamenting over this with my coworker when she said, "Why don't you just put Structure over the tape?"
If this works... nail art will never be the same. I'll keep ya'll posted.

Wednesday, December 18, 2013


For my second holiday mani this month I went really simple. I feel in LOVE with the white nails from this manicure and decided to go all white! But, of course, I couldn't leave it that simple... so I added a candy cane nail with a matte top coat ;)
Gelish White and Matte Candy Cane Nails
I used Sheek White and Red-y And Waiting for the candy cane, and added the Matte Top It Off over the accent nail to give it a nice, chalky, candy cane appearance. I'm actually almost completely out of Sheek White, and I'm asking for Arctic Freeze for Christmas - I'm hoping Arctic Freeze will be more opaque than Sheek White. I also went with a completely rounded shape on my nails. I think this might be a really flattering shape for my fingers, but I have noticed the nails are more "bendy" then usual. Either way I think I'm gonna keep the shape for a while. :)

Also, I got to use my new Ottlite for this picture (50% off at Michaels on Black Friday. Oh yeah)! I combined it with my old light and I LOVE how bright and crisp it is! Can't wait to take more nail pics with it.

Monday, December 16, 2013


Woah, it feels like forever since I posted (ok, only a week, but still!). I've been super busy with holiday-type stuff. Is anyone else counting the days until Xmas? Just this past Saturday I spent, literally, 12 hours straight baking cookies. It's worth it, and I love handing out plates of Xmas cookies, but MAN that's a long time to bake!
This week begins the Week of the Christmas Manicures. My coworker is coming over tomorrow, my roommate wants some simple red and gold nails, and then my fiancée and I will get our holiday nails on this weekend. I better just keep the red and green polishes out. ;)

In the meantime here's a NON-Christmas mani for your enjoyment :)
Gelish Pink Punk Stars and Glitter Nails
This mani is using Black Shadow with some Concrete Couture glitter accents and Brights Have More Fun with some Sweet 16 glitter accents. I used silver Folk Art acrylic paint to paint the silver accents.

I should also note that I'm late on posting this mani - I actually did it on my fiancée 3 weeks ago and am just now blogging it (my Instagram is always my most current place for manis). But Kim over at Ten Little Canvasses just posted a gorgeous shooting star mani a couple days ago. It's a weird coincidence, but I thought it was worth noting :)

Monday, December 9, 2013


It's December! And even down here in Southern California it's quite chilly. This month is absolutely packed for me, between office holiday parties, birthdays, THE HOBBIT, shopping, card-writing, THE HOBBIT, and the EPIC cookie-making weekend I have planed for next weekend, I'm pretty much BOOKED. Not to mention we're leaving on Christmas day to travel out to the midwest and visit the in-laws... and eat at Cracker Barrel and Steak N Shake. I'm simultaneously sad and glad we don't have either of those in California.
In really exciting me-news... I WON SOMETHING!!! Gelish Mini on Facebook was running a fall nail art competition. I submitted my fall nails for consideration... and I ended up winning!! The award was Trends polishes and a Mini kit (perfect timing - I'm almost out of Foundation and Nourish). If I end up getting Trends colors I already have I'm seeeeeriously considering running a giveaway! :)

And now on to this week's mani: snowflakes!
Gelish Snowflake Winter Nails
I've been so excited about getting into holiday and winter themed nails! I knew a few weeks ago I wanted snow flakes and I decided to go heavy on the white. Omg. I love these white nails. I'm going to have to force myself to use other colors besides white for the rest of my holiday nails this month. There actually is a coat of Rough Around The Edges on the gradient nails, but it's SO hard to see in the pic. Here's a close up:
Gelish Snowflake Winter Nails Rough Around The Edges
You can kinda see some flecks on the right side of the nail. I'm actually less and less impressed with that particular polish. If you just brush it on like you normally would, most of the little mylar flakes brush right off, so you kind of have to goup it on the nail to get a noticeable effect. In the end the effect is very, very minimal - but if minimal is what you want, Rough Around the Edges might be the polish for you.

For the above manicure I did the following:

Thumb Nail:
  1. • 2 coats Sheek White, cure all coats
  2. • 2 coats Up In The Blue, use a small piece of sponge on the uncured polish to create a gradient effect, cure all coats
  3. • 2 coats Caution, use a small piece of sponge on the uncured polish to create a gradient effect, cure all coats
  4. • 2 coats Rough Around The Edges on whole nail, cure all coats
  5. • Dabbed Gelish Structure onto the polish and pressed the studs in, cure
  6. • Finished with 2 coats of TIO, cure all coats

Index Nail:
  1. • 2 coats Sheek White, cure all coats
  2. • 2 coats Up In The Blue, use a small piece of sponge on the uncured polish to create a gradient effect, cure all coats
  3. • 2 coats Caution, use a small piece of sponge on the uncured polish to create a gradient effect, cure all coats
  4. • 2 coats Rough Around The Edges on whole nail, cure all coats
  5. • Wipe tacky layer. Using a nail art brush, paint snowflakes using white Folk Art acrylic paint. Let dry completely.
  6. • Dabbed Gelish Structure onto the polish and pressed the stud in, cure
  7. • Finished with 2 coats of TIO, cure all coats

Middle Nail:
  1. • 2 coats Sheek White, cure all coats
  2. • 1 coat TIO, cure
  3. • Wipe tacky layer. Lay down striping tape in criss-cross pattern
  4. • 1 coat Sheek White, cure
  5. • 1 coat Matte TIO, cure. DO NOT WIPE TACKY LAYER.
  6. • Using tweezers, slowy and carefully pull the striping tape off. It helps to keep the tweezers close to the nail as you pull, grabbing both the tape AND the polish that's covering the tape as you pull the tape off.
  7. • Once all tape is off, wipe tacky layer

Ring Nail:
  1. • 2 coats Sheek White, cure all coats
  2. • Wipe tacky layer. Using a nail art brush, paint snowflake using silver Folk Art acrylic paint. Let dry completely.
  3. • Dabbed Gelish Structure onto the polish and pressed the studs in, cure
  4. • Finished with 2 coats of TIO, cure all coats

Pinky Nail:
  1. • 2 coats Sheek White, cure all coats
  2. • 2 coats Up In The Blue, use a small piece of sponge on the uncured polish to create a gradient effect, cure all coats
  3. • 2 coats Caution, use a small piece of sponge on the uncured polish to create a gradient effect, cure all coats
  4. • 2 coats Rough Around The Edges on whole nail, cure all coats
  5. • Finished with 1 coat of TIO, cure

Monday, December 2, 2013


Oh man I LOVE the way this one turned out!!

My coworker had originally been throwing around the idea of having some Thanksgiving nails. Then she cut her hair. She got this super cute, super short rocker hair cut and I was like, "OMG SHE NEEDS NAILS TO MATCH!!" She let me go wild on her nails and I. love. them.
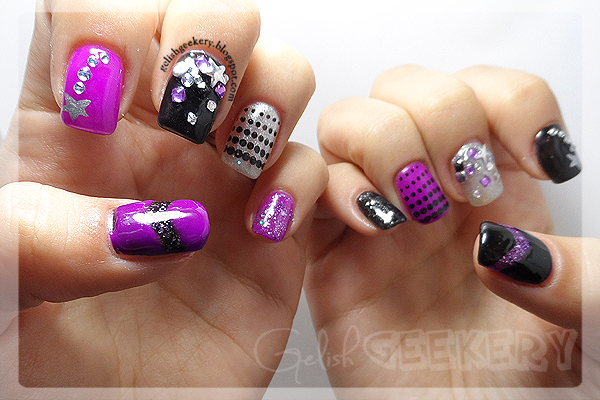
Gelish Black and Purple Stars Bling Nails
This mani is using Black Shadow, You Glare, I Glow (which I bought JUST for this), Little Miss Sparkle (the silvery color. I needed 3 coats for opacity), Concrete Couture (accented over some of the black), and Feel Me On Your Fingertips (accented over some of the purple). I loaded her middle fingers up with studs, used silver Folk Art acrylic paint to hand paint the star, and stamped her ring fingers with Konad black polish and plate M60. Whew! My fiancée and roommate BOTH want this mani ;) I think I'm going to do a variation of it on my fiancée - with black and neon pink. I'm so excited.

BLING!

Tuesday, November 26, 2013

If you've clicked through to my blog you might have noticed a few changes. :) I was over my last template and uploaded a free template I found on the interwebz (credits at the bottom of the page, however the banner is still my own ;). I really love the light colored blogs - they looks so clean and fresh and uncluttered. I also love that this template has a little featured post section at the top! How cute is that!?

I also fiiiiinally bit the bullet and set up a Facebook page. I really, really hate Facebook, but I figured it was a good tool to have. No joke, it took me like 2 hours to figure out what I needed to do. Two hours. I work in computer tech and do web adminy stuff for my job... and yet the labrynthine bowels of Facebook befuddle me every time.
But, well, now I have a Facebook page. I think I'm gonna use to to push blog posts and any news items or deals I come across that aren't worth a whole blog post. :) Now I'm trying to decide whether I should set up a Twitter for the same purpose... or if that's too redundant. We'll see.

In other news, this past weekend I got a repeat client! :D
Gelish Fall Tribal Manicure
She wanted fall colors and tribal, so that was what she got! I used Black Cherry Berry and Skinny Vanilla Latte, with a touch of All That Glitters Is Gold on the pinky. The black tribal design was drawn on with a Migi Nail Art Pen and the gold was painted on with a brush and gold Folk Art Acrylic paints. I don't think I was even breathing while drawing on the tribal designs! I kept repeating, "Straight lines, straight lines, straight lines...".

I also ran a bit of an experiment and I applied the studs OVER the TIO with a bit of Structure and didn't apply any more TIO over the studs - this is because I've noticed the gold colors tends to fade off the studs once the top coat is on. No buenos. I found out her studs already fell off, so I'm going to get some replacement studs over to her. I'm gonna try picking up some gold Pieadra studs. They tend to be more expensive, but it'd be worth it if they don't fade under the top coat.