Showing posts with label Gelish Polish: Ooocha Coocha. Show all posts

Monday, April 21, 2014


It's spring! And I've been craving some gorgeous spring colors on my nails, but I haven't really been inspired to wear "spring" nails - like flowers and bunnies and all that jazz. I knew I wanted to use Seafoam and Sweet Morning Dew, then I decided I wanted to use my seashell studs, and from there mermaid nails were born.
Gelish Spring Mermaid Nails
I'm in love with these nails. IN LOVE. I don't even have them on anymore and I'm still in love with them. If my nails hadn't been freakishly long (for my tastes) I would've kept them on for a third week. I loved the colors and the studs (gurl, I went STUD CRAZY) and OMG THE FOIL NAIL. Right now I'm like:
No joke. I also used the Gelish VitaGel Nourishing as the base coat for this mani. I've been hesitant to pick up a VitaGel because I read horrible reviews when they first came out. But my nails are just... guys, they're tore up. Not even gonna lie. It's because I use too many coats of Top It Off combined with Structure and studs and... it makes removal really, really hard on my nails.

But I'm happy to report I'm writing this up a day after removal with the VitaGel basecoat and... removal was fantastic!! I thought it'd be a particularly hard removal sesh, as the studs + the Structure make it difficult for the acetone to break down the polish, but the Vitagel came off super smooth and in solid pieces. I used it exactly as I would've used regular Foundation, dry brush and all, and I had absolutely no problems with wear. No peeling or lifting, removal was great, and my nails looked substantially less tore up once I got the polish off. I think I might switch exclusively over to VitaGel for my manis here on out!

Oh, and I'm stoopid for not taking before/after pics for the VitaGel. Lots of fail right there.

For the above manicure I did the following:

Thumb Nail:
  1. • 2 coats Sweet Morning Dew, cure all coats
  2. • Dabbed Gelish Structure onto the polish and pressed the studs in, cure
  3. • Finished with 2 coats of TIO, cure all coats

Index Nail:
  1. • 3 coats Seafoam, cure all coats
  2. • 1 coat Candy Shop, cure
  3. • Dabbed Gelish Structure onto the polish and pressed the studs in, cure
  4. • Finished with 2 coats of TIO, cure all coats

Middle Nail:
  1. • 1 coat Oocha Coocha, cure
  2. • 1 coat Are You Feeling It?, cure
  3. • 1 coat Oocha Coocha, cure
  4. • 1 coat of TIO, cure
  5. • Wipe tacky layer. Stamp image using Konad White and MoYou Suki 01 plate. Let dry completely.
  6. • Finished with 1 coat of TIO, cure

Ring Nail:
  1. • 2 coats Sweet Morning Dew, cure all coats
  2. • Dabbed Gelish Structure onto the polish and pressed the studs in, cure
  3. • Finished with 2 coats of TIO, cure all coats

Pinky Nail:
  1. • 3 coats Seafoam, cure all coats
  2. • Press gold foil into the tacky layer until desired look is achieved
  3. • Finished with 1 coat of TIO, cure

Sunday, September 29, 2013

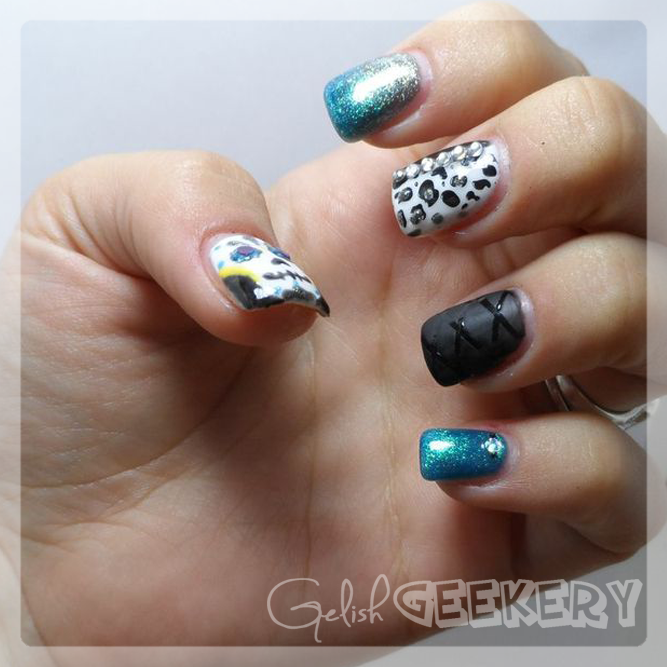
Gelish Halloween Manicure With Day Of The Dead Nail So many exciting things are happening in the world of Gelish!!! They're coming out with a new matte Top It Off AND it looks like they're introducing their new Trends collection in October, too! Seriously, on October 1st I will be calling Sally's to see if they have the new awesomeness in stock. I WAAAANT that matte top coat SO BAD.

The matte TIO REALLY would've come in handy this past weekend, too. I did a Gelish manicure on my work colleague and I wanted to try a criss-cross matte/shiny look with the Orly Matte top coat I have, like this:
Black Matte Nails
By neglelakkmani.com

I put on the regular Gelish TIO, laid down some striping tape, then put two coats of Orly Matte top coat on, letting each coat dry. What I found once I started pulling the tape off was that the matte top coat gunked up along the tape and left these thick, gunky lines all over the nail. The only way to get it to work right was to take the striping tape off BEFORE the top coat dries. The whole time I was thinking, "If this was 3 days later I'd have my Gelish matte top coat, grumble grumble".
Gelish Halloween Manicure With Day Of The Dead Nail
In the end I think her mani did turn out pretty cute! I got to do a bunch of different elements: matte, stamping, gradient, and nail art! I bought some new nail art brushes so I could paint the Dia De Los Muertos skull on her thumb. Man, I need a carpal tunnel wrist brace for painting detail. I was shaking all over the place!!
Gelish Dia De Los Muertos Skull Nail
Also, I should add... painting Gelish on acrylics? WONDERFUL. I spent hours on Saturday night looking up acrylics, tips, and sculpting with hard gel. Man, that is REALLY cool stuff. I don't think I'd want acrylics or hard gel on my own nails, but they really look like a LOT of fun. I kinda sorta want to look into online classes, get some knowledge, maybe see if I'd want to invest the time and money in taking "real" classes. I'm kinda fascinated by all this!

For the above manicure I did the following:

Pinky Nail:
  1. 3 coats Oocha Coocha Bing Bang Bam Alakazy Alakazam, cured all coats
  2. Dabbed Foundation and pressed the studs in, cured
  3. 1 coat TIO, cure
Ring Nail:
  1. 2 coats of Black Shadow, cured all coats
  2. 1 coat TIO, cure
  3. Laid down striping tape
  4. 1 coat Orly Matte top coat, immediately remove striping tape BEFORE top coat dries
Middle Nail:
  1. 3 coats Sheek White, cured all coats
  2. Wiped tacky layer with Cleanser
  3. 2 coats of Black Shadow off-set along the side of the nail, cured all coats
  4. 1 coat TIO, cure
  5. Wiped tacky layer with Cleanser
  6. Using Konad Black stamping polish, stamp Konad cheetah print into nail
  7. Let dry, then dabbed Showstopping into the centers of the cheetah print, cure
  8. Dabbed Foundation and pressed the studs in, cured
  9. 1 coat TIO, cure
Index Nail:
  1. 3 coats Showstopping, cured all coats
  2. Applied Oocha Coocha to the top half of the nail and, before curing, applied more Showstopping toward the bottom, brushing the wet colors together to make a gradient, cure
  3. Repeat step 2 as needed to achieve gradient
  4. 1 coat TIO, cure
Thumb Nail:
  1. 3 coats Sheek White, cured all coats
  2. Wiped tacky layer with Cleanser
  3. Painting details using Ooocha Coocha, Black Shadow, Showstopping, and Gella by ENP in "Lily", curing as needed
  4. Dabbed Foundation and pressed the studs in, cured
  5. 1 coat TIO, cure